


1 Quick Start Guide
Step 2: Try some equalization
Play some signal into the unit
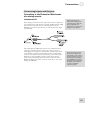
While learning the unit, you should play a CD or a multitrack
source into the equalizer. Choose a song or musical passage with a
fairly consistent level, so you can take your time experimenting
with the different features.
1. Put the mixer’s main faders all the way down so you don’t
distort the unit by sending it too much signal.
A
t the factory, we set all of
Program 00’s frequencies to
0 dB. It’s a good idea to leave
Program 00 this way, but if
y
ou have already overwritten
it with some of your own
settings, you can just create
y
our own program with
“flat” settings for the
p
urposes of this experiment.
2. Select program 00 on the DEQ830. This will call up a
program with all frequencies set to 0 dB, allowing you to hear
the changes you make to the audio more easily.
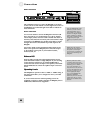
3. Begin playing your source material. Bring the mixer’s main
faders up gradually until the Channel Meters for Channels 1
and 2 begin to light up. Carefully increase the mixer’s output
level until the meters’ green and yellow LEDs are lit most of
the time. If the red CLIP LEDs at the top of the meters light
up at all, back the mixer’s output level down until they stop
lighting up. This is important, because these red LEDs indicate
that the signal is clipping on that channel.
R
emember: if the red CLIP
L
ED at the top of a Channel
M
eter lights up, that means
the signal is clipping. To
p
revent this, reduce the level
being sent to the proper
channel.
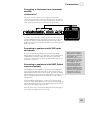
4. Press one of the [BAND SELECT] buttons to select a
frequency. One of the LEDs above that button will begin to
blink.
5. Use the [VALUE] encoder to decrease or increase the chosen
frequency. If desired, select another frequency and repeat this
process.
6. Press the [BYPASS] button to hear the signal without the
equalization effect. Press it again to return to the EQ’d signal.
7. Repeat steps 3 – 6 for the other audio sources you have
connected to the DEQ830.
Step 3: Store the Program
Once you have created an interesting program, you can save it to
one of the 100 user program locations. Here’s how to do this:
P
rograms 25-9
9
have been
left blank so you have
somewhere to store your
p
rograms right away without
overwriting the factory
p
resets.
1. Press the [STORE] button to enter Store mode.
2. Use the [VALUE] encoder to select the new location for the
edited program. For your convenience, programs 25-99 have
been left blank so you can store your editing experiments
somewhere without fear of overwriting a program you might
want to use later.
3. Press the [VALUE] encoder to store the program to the new
location. This will preserve the EQ settings for all eight
channels of audio.
For a detailed explanation of how to use this mode, see page 41.
16