


3 Basics of Equalization
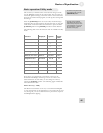
Copying settings between channels
You can use the Link function while editing to help set up identical
curves on multiple channels. But at some point the curves may
need to diverge slightly (or significantly). Rather than unlinking the
channels and starting all over again, you can use the Curve Bank to
“bounce” the settings from one channel to another. Then you can
begin diversifying the settings of the channels to match the needs
of the incoming audio.
To do this, select the channel from which you wish to copy, and
save it in an unused location in the Curve Bank. Then simply select
the destination channel and retrieve the curve you just stored.
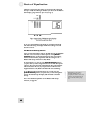
Basic operation: Channel Level mode
To enter Channel Level mode, just press the [CHANNEL
LEVEL] button while you are in Program mode. This allows you
to use the [VALUE] encoder to adjust the level of the currently
selected channel or Link Group.
The DEQ830 will allow each channel to be boosted up to +12 dB
or cut to -12 dB. If you want another 6 dB of gain (for a total of
18 dB), you will find that in the Master Level function in Utility
mode. But remember, the settings for Channel Level mode are
stored with each program. The settings for the Master Level
function are not.
To exit Channel Level mode and return to Program mode, press
the [PROGRAM] button.
Basic operation: Link mode
The ability to link channels is a very handy feature. The most
common application is in setting up matching EQ curves for
stereo instruments or program material, but you may link up to
eight channels together if you wish. The first thing to do is decide
which channels you would like to link, and then pick one of them
to become the “primary” channel. All other channels that you link
to the primary channel are known as “non-primary” channels. As
soon as they are linked, all non-primary channels will adopt the
EQ curve of the primary channel. From that point on, when you
make an edit on the primary channel, an identical edit will be made
to the audio passing through the non-primary channel as well. This
includes changes to the Channel Level setting, also.
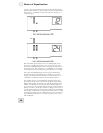
To make it happen, hold down the [LINK] button and press the
[CHANNEL SELECT] button of the channel(s) you wish to
link to the primary channel. You will know the channels are linked
when you see more than one channel with a yellow Channel
Number LED lit. You can now make an edit to any linked channel
and it will affect all linked channels. To unlink a channel, hold
[LINK] while pressing the linked channel’s button. Note that the
primary channel cannot be unlinked from its Link Group.
42