


39 En
Optimizing the speaker setting for your listening room (YPAO)
PREPARATION
English
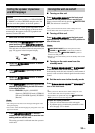
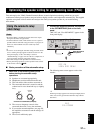
6 Press
G
SET MENU to exit from the GUI
screen.
• After you have completed the automatic setup procedure, be
sure to disconnect the optimizer microphone.
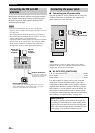
• The optimizer microphone is sensitive to heat. Keep it away
from direct sunlight and do not place it on top of this unit.
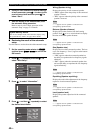
■ Customizing the measurements
You can select the parametric equalizer type, and activate
or deactivate each check items.
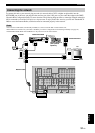
1 Connect the supplied optimizer microphone
to this unit and place the microphone
appropriately.
Refer to the steps 1 to 3 of “Basic procedure” on page
41.
2 Press
4
k to select “Setup Menu” and then
4
h.
“Setup Menu” is selected as the currently selected
menu item.
3 Press
4
k / n repeatedly to select “Wiring”,
“Distance”, “Size”, “Equalizing”, or “Level”,
and then press
4
h to set the selected
parameter.
4 Press
4
k / n repeatedly to select the desired
parameter and then
4
ENTER to confirm the
selection.
5 Repeat steps 3 and 4 until you set all the
desired parameters.
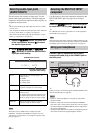
This unit performs the following checks:
Wiring (Speaker wiring)
Checks which speakers are connected and the
polarity of each speaker.
Distance (Speaker distance)
Checks the distance of each speaker from the
listening position and adjusts the timing of each
channel.
Size (Speaker size)
Checks the frequency response of each speaker and
sets the appropriate low-frequency crossover for each
channel.
Choices: Check, Skip
• Select “Check” to automatically check and adjust
the item.
• Select “Skip” to skip the item and perform no
adjustments.
Equalizing (Parametric equalizer level)
Parametric equalizer adjusts the level of the specified
frequency bands. This unit automatically selects the
crucial frequency bands for the listening room and
adjusts the level of the selected frequency bands to
create a cohesive sound field in the room. You can
select the type of the parametric equalizer adjustment
from the following choices.
Choices: Check:Natural, Check:Flat, Check:Front,
Skip
• Select “Check:Natural” to average out the
frequency response of all speakers with higher
frequencies being less emphasized. Recommended
if the “Check:Flat” setting sounds a little harsh.
• Select “Check:Flat” to average the frequency
response of all speakers. Recommended if all of
your speakers are of similar quality.
• Select “Check:Front” to adjust the frequency
response of each speaker in accordance with the
sound of your front speakers. Recommended if
your front speakers are of much higher quality than
your other speakers.
• Select “Skip” to skip the selected item and perform
no adjustments.
Level (Volume level)
Checks and adjusts the volume level of each speaker.
Choices: Check, Skip
• Select “Check” to automatically check and adjust
this item.
• Select “Skip” to skip this item and perform no
adjustments.
y
A check mark appears at the left of the parameter you set
other then “Skip”.
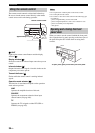
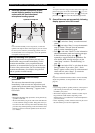
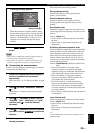
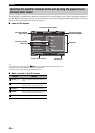
If warning message appears...
When this unit detects potential problems during
the automatic setup procedure, warning messages
appears in the result display. See the “Auto Setup”
section in “Troubleshooting” on page 135 for a
complete list of warning messages and proper
remedies.
Notes
✓
✓
✓
Equalizing
Level
Result
Retry
Exit Detail
Setup
Measurement Over
W1:Out of Phase
W3:Level Error
Warning messages