


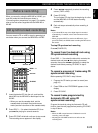
RECORDING USING THE MDX-M5 OR KX-M5
E-24
1 Insert the desired disc into the unit, and load a
blank tape into the KX-M5.
2 Press DISC 1 – 3 to select the desired CD, then
press 7 after playing for several seconds.
3 Set the KX-M5 to forward direct and reverse mode
(see instruction of the KX-M5).
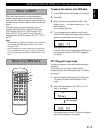
4 Press EDIT.
“C–46” appears in the display.
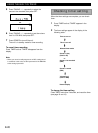
5 Press EDIT repeatedly to select the length of tape
to be used.
Each time you press EDIT, the length of tape
changes as follows:
Automatic CD edit
recording on the KX-M5
By specifying the total possible recording time of the
tape, the unit programs tracks or helps you to program
tracks so they will fit onto the tape with the least
amount of unrecorded space remaining at each end of
the tape.
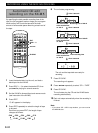
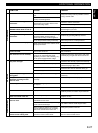
6 The unit starts programming.
The unit and the tape deck are ready for
recording.
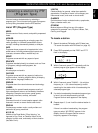
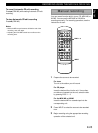
7 Press CD SYNC.
The recording unit appears.
8 Press 4/¢ repeatedly to select “CD → TAPE”
9 Press CD SYNC.
The unit starts play the CD and the KX-M5 starts
recording automatically.
10 Each unit stops automatically when the recording is
finished.
Note
• If you select “CD → MD” in step 8 above, you can record to
the MDX-M5 also.
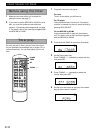
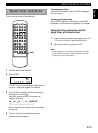
Remaining time of side A
The track number
to be recorded last
on side A
Remaining time of side B
The track number
to be recorded last
on side B
Total recording time
After 3 seconds
After 3 seconds
After 3 seconds
EDIT
1
2
3
PROGRAM
TOTAL
EDIT
TRACK
1
2
3
PROGRAM
EDIT
TRACK
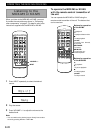
After 3 seconds
The track number
to be recorded last
on side B
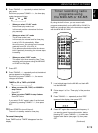
POWER TIMER SET
TUNING
FM/AM ST/MONO DISC
MEMORY
TUNER CD
INPUT SLEEP MUTE VOLUME
CLOCK
TAPE
MD
CT
PTY RTRDS
/
231
12345
67890
TIME REP EDIT
PGM
PRESET
/
REC/
PAUSE
REC/
MUTE
CD
SYNC
+10
/
–+
CD SYNC
4/¢
DISC 1 – 3
7
C-120 C-100 C-90
C-46 C-50 C-54 C-60 C-74
1
2
3
REMAIN
PROGRAM
EDITA
TRACK
1
2
3
REMAIN
PROGRAM
EDIT B
TRACK