


GETTING STARTED
E-6
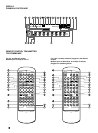
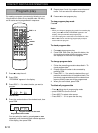
Preparing the remote
control transmitter
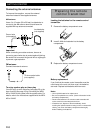
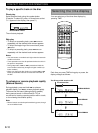
Loading the batteries for the remote control
transmitter
1 Remove the battery compartment cover.
2 Insert 2 AAA size batteries into the battery
compartment.
3 Replace the battery compartment cover.
Battery replacement
If you find that the remote control transmitter must be
used closer to the main unit than usual, the batteries
are weak. Replace both batteries with new ones.
Notes
• Use only AAA batteries for replacement.
• Be sure the polarities are correct. (See the illustration inside
the battery compartment.)
• Remove the batteries if the remote control transmitter will
not be used for an extended period of time.
• If batteries leak, dispose of them immediately. Avoid
touching the leaked material or letting it come in contact with
clothing, etc. Clean the battery compartment thoroughly
before installing new batteries.
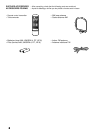
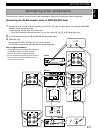
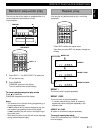
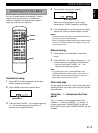
Connecting the external antennas
To improve the reception, connect the external
antennas instead of the supplied antennas.
75-ohm coaxial cable
(not supplied)
FM
75
UNBAL
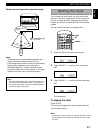
AM antenna
Use a 6 to 15 meter (20 to 50 feet) insulated wire to
connect to the AM antenna terminal and leave the
supplied AM loop antenna connected.
FM antenna
Connect the external antenna.
Important
When connecting an outdoor antenna, be sure to
connect a ground wire also to protect against lightning.
Be careful not to connect the ground wire to a gas pipe
to prevent a gas explosion.
Ground wire
(not supplied)
Insulated wire
(not supplied)
GND AM
To enjoy synchro play or timer play
You can enjoy synchro recording (see page 23) or the
timer function (see page 18) by connecting the MDX-
M5 or KX-M5 to the system with the system cable. For
details, refer to the instructions supplied with the MDX-
M5 or KX-M5.
+
–
+
–