


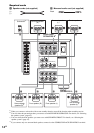


Getting Started
21
GB
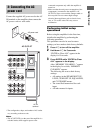
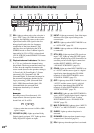
Adjust the speaker levels and balance while
listening the test tone from your listening
position. Use the remote for these operations.
For details on remote operations, refer to the
operating instructions supplied with the remote.
Tip
The amplifier employs a test tone with a frequency
centered at 800 Hz.
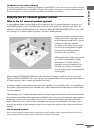
1 Press ?/1 on the remote to turn on the
amplifier.
2 Press < on the remote repeatedly until
RECEIVER menu appears.
3 Move the easy scroll key to select
“TEST TONE”, then press the key to
enter the selection.
“TEST TONE” in the LEVEL menu
appears in the display and the test tone is
output from each speaker in sequence.
4 Adjust the speaker level and balance
using the LEVEL menu so that the level
of the test tone sounds the same from
each speaker.
For details on the LEVEL menu settings,
see page 33.
Tips
• To adjust the level of all speakers at the same
time, press MASTER VOL +/– on the remote or
turn MASTER VOLUME on the amplifier.
• You can also use TEST TONE on the amplifier
to turn on or off the test tone.
• You can also use –/+ on the amplifier for the
adjustment.
5 After the adjustment, press < on the
remote repeatedly again until amplifier
menu appears.
6 Move the easy scroll key to select
“TEST TONE”, then press the key
repeatedly to select “TEST TONE
[OFF]”.
The test tone turns off.
To output the test tone only from
a specific speaker
Set “TEST TONE” in the LEVEL menu to
“FIX” (page 33). The test tone is output only
from the selected speaker.
For more precise adjustment
You can output the test tone or sound source
from two adjacent speakers to adjust their
balance and level.
Set “MENU EXPAND” in the CUSTOMIZE
menu to “ON” (page 36). Then select the two
speakers you want to adjust using “PHASE
NOISE” or “PHASE AUDIO” in the LEVEL
menu (page 41).
5: Adjusting the speaker
levels and balance
— TEST TONE