


25
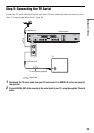
Hookups and Settings
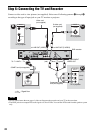
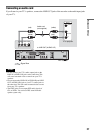
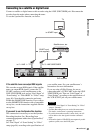
A Connecting to a SCART input jack
Connect using a SCART cord (not supplied) to the
LINE 1-TV jack and your TV. Be sure of a firm
connection to avoid hum and noise.
See the operating instructions supplied with the
TV to be connected. When you set “Line1 Output”
to “S Video” or “RGB” in “Easy Setup” (page 34),
use a SCART cord that conforms to the selected
signal.
B Connecting to a video input jack
Connect using a video cord (not supplied) to the
yellow LINE OUT (VIDEO) jack. You will enjoy
standard quality images.
C Connecting to an S VIDEO input
jack
Connect using an S-video cord (not supplied) to
the LINE OUT (S VIDEO) jack. You will enjoy
high quality images.
D Connecting to component video
input jacks (Y, P
B/CB, PR/CR,)
Connect the COMPONENT VIDEO OUT jacks
using a component video cord (not supplied) or
three video cords (not supplied) of the same kind
and length. You will enjoy accurate colour
reproduction and high quality images.
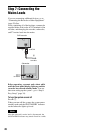
If your TV accepts progressive 525p/625p format
signals, you must use this connection and set
“Component Out” in “Video” setup to “On”
(page 96). Then press PROGRESSIVE on the
remote to send progressive video signals. For
details, see “Using the PROGRESSIVE button”
on page 26.
When playing “wide screen” images
Some recorded images may not fit your TV
screen. To change the picture size, see page 95.
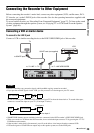
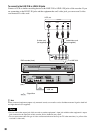
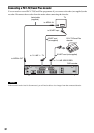
If you are connecting to a VCR
Connect your VCR to the LINE 3/DECODER
jack on the recorder (page 29).
Notes
• Do not connect more than one type of video cord
between the recorder and your TV at the same time.
• You cannot use the PROGRESSIVE button with the
connections B and C.
• When you connect the recorder to your TV via a
SCART jack, the TV’s input source is set to the
recorder automatically when you start playback. If
necessary, press t TV/DVD to return the input to
TV.
• For correct SMARTLINK connection, you will need a
SCART cord that has the full 21 pins. See your TV’s
instruction manual as well for this connection.
• If you connect this recorder to a TV with
SMARTLINK, set “Line1 Output” to “Video” in “Easy
Setup.”
About the SMARTLINK features (for
SCART connections only)
If the connected TV (or other connected
equipment such as a set top box) complies with
SMARTLINK, NexTView Link
*3
,
MEGALOGIC
*1
, EASYLINK
*2
,
CINEMALINK
*2
, Q-Link
*3
, EURO VIEW
LINK
*4
, or T-V LINK
*5
, this recorder
automatically runs the SMARTLINK function
after you complete the connection pattern A on
page 24 (the SMARTLINK indicator lights up
when you turn on your TV). You can enjoy the
following SMARTLINK features.
•Preset Download
You can download the tuner preset data from
your TV to this recorder, and tune the recorder
according to that data in “Easy Setup.” This
further simplifies the “Easy Setup” procedure.
Be careful not to disconnect the cables or exit the
“Easy Setup” function during this procedure
(page 34).
• TV Direct Rec
You can easily record what you are currently
watching (page 38).
• One Touch Play
You can turn on the recorder and TV, set the
TV’s input to the recorder, and start playback
with one touch of the H (play) button
(page 61).
• One Touch Menu
You can turn on the recorder and TV, set the TV
to the recorder’s channel, and display the Title
List menu with one touch of the TITLE LIST
button (page 61).
• One Touch Timer
You can turn on the recorder and TV, set the TV
to the recorder’s channel, and display the timer
programming menu with one touch of the
TIMER button (page 51).
• Automatic Power Off
The recorder will turn off automatically if the
recorder is not used after you turn off the TV.
,continued