


5
MZ-B10
SECTION 2
GENERAL
Looking at the controls
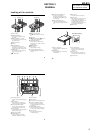
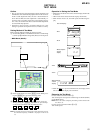
Front of the recorder
A Display window
B MENU/ENTER button
You can use various settings using
menu items.
C SPEED CONTROL +, – button
Use this button to increase or decrease
the playback speed.
D Built-in microphone
E Speakers
F REC MODE button
Use this button to select 2 times
normal (LP2 or monaural) or 4 times
(LP4) the normal (SP) recording time.
G GROUP button
This button is used when cueing to a
group or erasing a group.
H x STOP button
I
N
PLAY (play) button
The
N
•
PLAY button has a tactile
dot.
J REC button
K
.
•
REVIEW • AMS,
>
CUE
AMS (search /AMS) buttons
L TRACK MARK button
Use this button to add track marks
automatically or to divide a track into
separate tracks.
M
X
PAUSE button
N REC indicator
Lights up while recording.
O i (headphones/earphones) jack
Connect headphones or earphones to
this jack.
1
6789 q;
2435
qgqhqjqk ql w;
qa qsqd qf
•
•
•
•
9
10
P MIC (PLUG IN POWER) jack
Connect an optional stereo
microphone to this jack to record.
The MIC (PLUG IN POWER) jack
has a tactile dot.
Q LINE IN (OPTICAL) jack
Connect an optional optical or line
cable to this jack to record from a CD,
etc.
R VOL control
The VOL control has a tactile dot.
S HOLD switch
Slide the switch in the direction of the
arrow (a yellow mark appears) to
disable the buttons on the recorder. To
prevent the buttons from being
accidentally operated when you carry
the recorder, use this function.
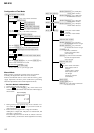
T OPEN switch
Back of the recorder
A Battery compartment
Insert two alkaline dry batteries (size
AA) here.
B ERASE button
During playback, press this button to
erase the track.
C ALL ERASE button
Press ERASE while pressing this
button to erase the contents of an
entire disc.
D DC IN 3V jack
When you connect an optional AC
power adaptor, connect it to this jack.
E Handstrap hole
2
1
34
5
How to attach a hand strap
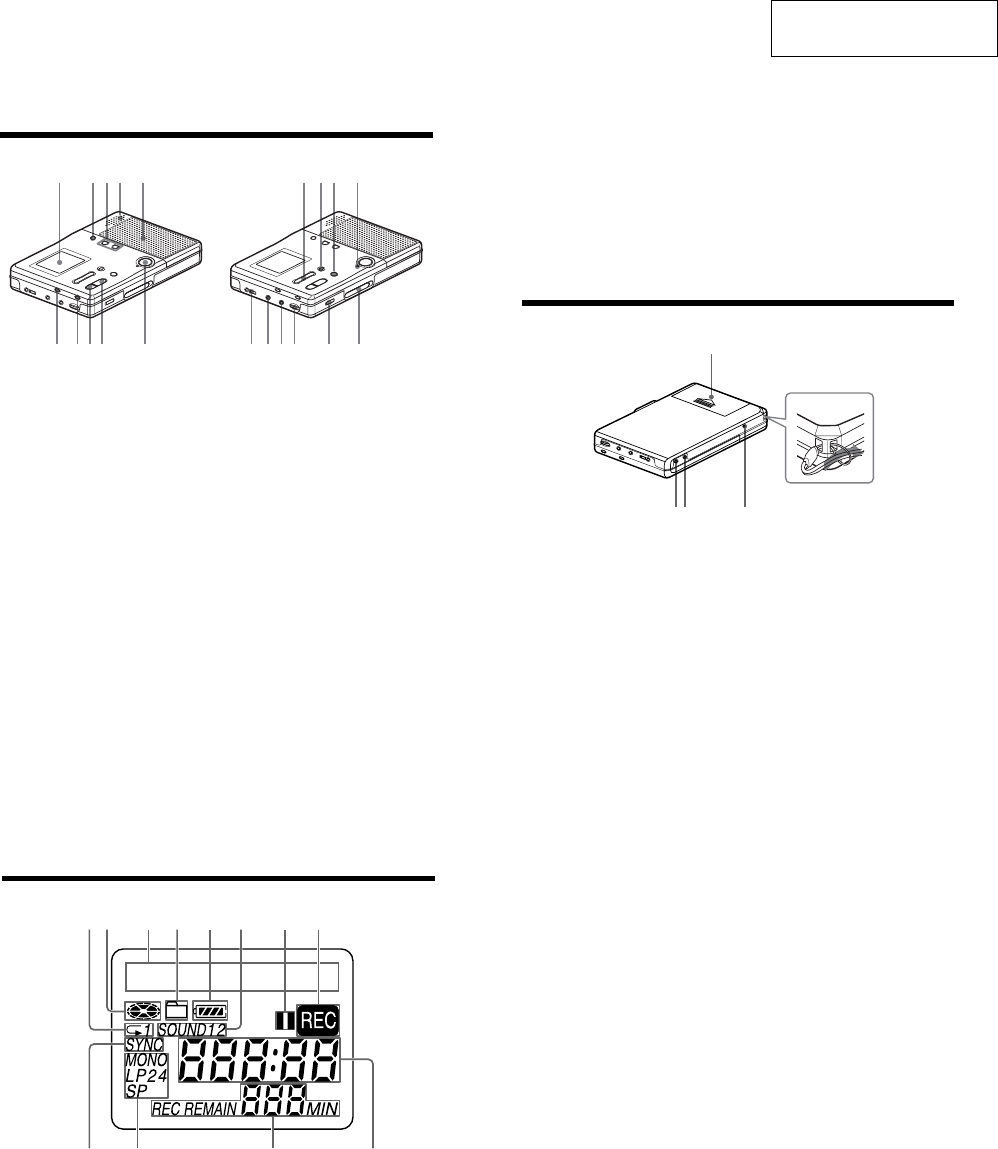
The display window
A Play mode indication
Lights up when selecting specific play
mode.
B Disc indication
Shows that the disc is rotating for
recording, playing or editing an MD.
C Character information display
Displays the disc and track names,
error messages, track numbers, etc.
D Group indication
Lights up while in group play. Flashes
while selecting a group.
E Battery level indication
F SOUND indication
Lights up when the sound mode
(SOUND 1, SOUND 2) is selected.
G Pause indication
H REC indication
I SYNC (synchro-recording) indication
J SP, LP2, LP4, MONO indication
Shows the recording mode while
recording and SP/LP mode of a track
while playing.
K REC REMAIN indication
Shows the remaining recordable time
in a disc while recording or stopped.
L Time indication
Shows the elapsed time while
recording or playing.
12 3 4
9q; qa qs
56 78
11
This section is extracted
from instruction manual.