


27
MZ-B10
Laser Power Check
Note: If result of measurement of the laser power does not satisfy
the specification, either replace the OP (optical pick-up unit)
or check whether the laser circuit block is working correctly.
When the result of laser power measurement does not satisfy
the specification even though the laser circuit block is con-
firmed to be working correctly, replace the OP (optical pick-
up unit).
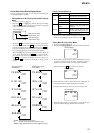
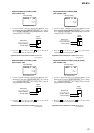
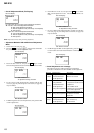
• Connection
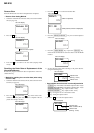
• Checking method
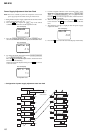
1. Select the manual mode of test mode (see page 16), and set the
laser power check mode (item number 010).
2. Press the . key continuously until the optical pick-up
moves to the most inward track.
3. Open the cover and set the laser power meter on the objective
lens of the optical pick-up.
4. Press the > key, and set the laser MO read check mode
(item number 011).
5. Check that the laser power meter reading is 0.800 ± 0.10
mW.
6. Press the > key, and set the laser CD read adjustment mode
(item number 012). Modify the adjusted value to 18 with the
[SPEED CONTROL +] or [SPEED CONTROL --] key.
7. Check that the laser power meter reading is 0.910 ± 0.11 mW.
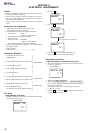
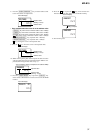
8. Press the > key, and set the laser MO (X2 speed) write
check mode (item number 013). Modify the adjusted value to
85 with the [SPEED CONTROL +] or [SPEED CONTROL -
-] key.
9. Check that the laser power meter reading is 4.95 ± 0.59 mW.
10. Press the
> key, and set the laser MO (X4 speed) write
check mode (item number 014). Modify the adjusted value to
9E with the [SPEED CONTROL +] or [SPEED CONTROL -
-] key.
11. Check that the laser power meter reading is 5.93 ± 0.71mW.
12. Press the x key to quit the manual mode, and activate the
test mode (display check mode).
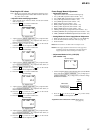
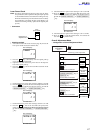
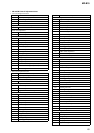
Overall Adjustment Mode
• Configuration of Overall Adjustment Mode
laser
power mete
r
optical pick-up
objective lens
Laser
010
Set LCD display
LrefPw 16
011
Set LCD display
16
: Initial value
HrefPw 18
012
Set LCD display
18
: Initial value
WrPwLo 85
013
Set LCD display
85
: Initial value
WrPwHi 9E
014
Set LCD display
9E
: Initial value
Overall adjustment mode
(Title display)
"Assy**"
Continuing overall adjustment
x
key
.
key
>
key
CD overall
adjusting
MO overall
adjusting
Electrical
offset
adjustment
Automatic
Disc
discrimination
overall
adjustment
Temperature
correction
and
Power supply
adjustment
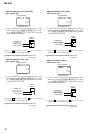
auto item feed
[SPEED CONTROL +] key or
[DISPLAY] key
on the remote commander
[SPEED CONTROL -] key or
[P MODE] key
on the remote commander
N
key or
u
key
on the remote commander
NV reset
(item number 21)
[GROUP] key or
key
on the remote commander
Ver 1.1 2003.06