


44
Timer recording radio
programs
To timer-record, make sure that you have set
the system clock correctly (see “Setting the
time” on page 9) and preset the radio station
(see “Presetting radio stations” on page 36).
1 Tune in the desired preset radio station
(see “Listening to the radio” on page
37).
2 Load a recordable tape or MD.
3 Press CLOCK/TIMER SET on the
remote.
“DAILY SET” appears.
4 Press . or > on the remote
repeatedly until “MD REC SET” or
“TAPE REC SET” appears in the
display, then press ENTER/YES on the
remote.
“ON” and “c REC” appear in the display,
then the hour indication flashes.
5 Set the starting time.
Press . or > on the remote repeatedly
to set the hour, then press ENTER/YES on
the remote.
The minute indication begins flashing next.
Press . or > on the remote repeatedly
to set the minute, then press ENTER/YES
on the remote.
“OFF” appears, then the hour indication
flashes again.
6 Set the stopping time by repeating step
5.
7 When you record on an MD, select the
recording mode (e.g., LP2) by pressing
. or > on the remote, then press
ENTER/YES on the remote.
The timer recording settings appear, then
the original display returns.
To
Check the settings/
activate the timer
Change the setting
Turn off the timer
Notes
• The system will turn on 30 seconds before the
specified starting time. Do not operate the system
from the time the system turns on until the daily
timer starts. Otherwise the timer will not be
activated correctly.
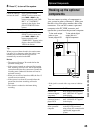
• You cannot use the optional components connected
to ANALOG IN jack as the sound source for Daily
Timer.
Do this
Press CLOCK/TIMER
SELECT on the remote and
press . or > on the
remote repeatedly until
“DAILY SELECT” appears in
the display, then press ENTER/
YES on the remote.
Start over from step 1.
Press CLOCK/TIMER
SELECT on the remote and
press . or > on the
remote repeatedly until
“TIMER OFF?” appears in the
display, then press ENTER/
YES on the remote.
Waking up to music (continued)