


1-17
DFS-700/700P
Chapter 3 Basic Operation
3-6
Chapter 3 Basic Operation
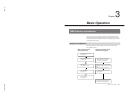
Procedure
1
Pull the fader lever toward you as far as it will go.
2
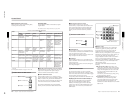
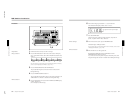
Press the MATTES button in the menu control section, and display
page 1 of the MATTE menu, then with the F1(SELECT) button select
“INT V”.
MATTE
1/2
SELECT
INT V
Lum
0-100
Sat
0-100
Hue
0-99
CH2BRD
BRDMAT
PAGE F1 F2 F3 F4 F5
You can change the color of matte color and embossing pattern. For details,
see the section “Adjusting Color Mattes” (page 3-57).
3
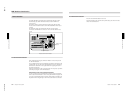
Press the BACKGROUND bus INT VIDEO button.
The pressed button lights red, and a color matte is selected as the
background image.
4
Press the FOREGROUND bus button 1.
The pressed button lights amber, and the video signal connected to the
VIDEO INPUT 1 connector is selected as the foreground image.
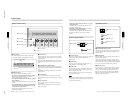
5
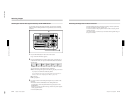
Press the SET button to the right of the PATTERN NUMBER display
window, turning it on.
(If it is already lit, omit this step.)
LAST X
INS
RST
TITLE
12
EDITOR LUM LUM LUM
DSK EDGE
TRAIL
SHADOW
GPI CRK CRK BORDERBEVELD
EDGE
SET UP MASK MASK MASK SOFT
SHIFT CCR LIGHTING BORDERMATTES
LOCATION
LEARNEDIT
RECALL
HOLD
INPUT
INITIAL
PATTERN
ADJ
PAGE
F1 F2 F3 F4 F5
USER PGM
STATUS EDIT
SNAP SHOT
SET
PATTERN NUMBER
EFFECT
DSK
FTB
SET
TRANS RATE
789
456
123
0
DOWN UP
ENTER
FADE
TO
BLACK
P IN P
DSK
DEL
N/R REV DSK PVWDIRECT
RECALL
DIRECT
PATTERN
CCR TITLE 1
SOURCE
TITLE 2
SOURCE
DSK
FILL
SUPER BGFRGD 2MEMORYFRAME FREEZ MIX EFFECT
BACKGROUND
BLACK MEMORY INT
VIDEO
TITLE
12345678
CUT
AUTO
TRANS
AUXILIARY
BLACK
MEMORY
INT
VIDEO
12345678
FOREGROUND
BLACK
MEMORY
INT
VIDEO
12345678
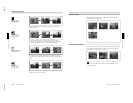
PATTERN/KEY PAD
7
4
3
1,9
8
6
2
5
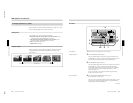
DME Switcher Introduction
<Preparation>
<Image selection>
<Effect selection>
Chapter 3 Basic Operation
Chapter 3 Basic Operation
3-7
<Effect execution>
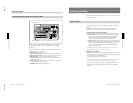
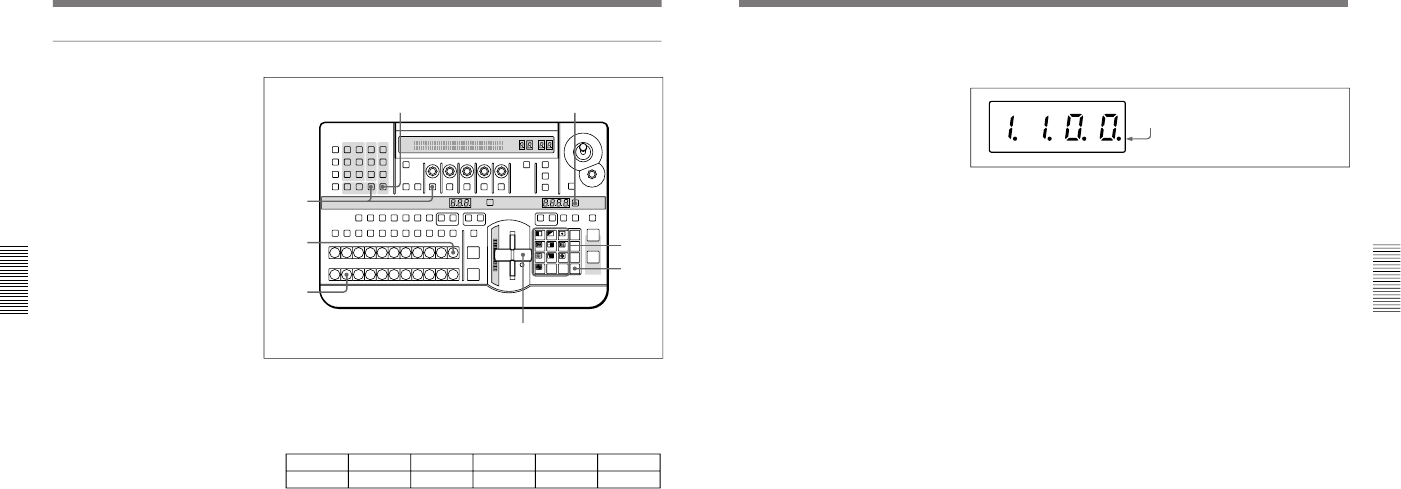
6
In the numeric keypad, press buttons 1, 1, 0, 0, in that order.
The TRANS RATE display window shows “1.1.0.0.”.
7
Press the ENTER button.
The dots to the lower right of the digits disappear, and picture-in-
picture, or pattern number 1100, is selected.
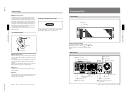
8
In the menu control section, press the BORDER button.
The button lights, enabling the border.
You can change the color and width of the border. For details, see the section
“Modifying the Boundary” (page 3-26).
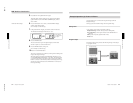
9
Move the fader lever to the opposite end.
Both the BACKGROUND bus INT VIDEO button and the
FOREGROUND bus button 1 light red.
As you move the lever, the picture-in-picture effect takes place, and a
foreground image with a border is inserted into the background image.
Dots appear to the lower right of the digits.
<Border settings>