


Maintenance and Troubleshooting
72 Runco LS-10i Installation/Operation Manual
PRE
L
IMINAR
Y
5.2
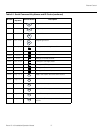
Troubleshooting Tips
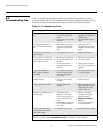
Table 5-1 provides some general guidelines for troubleshooting problems you may
encounter with the LS-10i. If the suggested solutions fail to resolve the problem or if you
encounter an issue not described here, please contact Runco Technical Support.
Table 5-1. Troubleshooting Chart
Symptom Possible Cause(s) Solution
The projector does not turn
on.
• The LS-10i is not plugged
in or the AC outlet is not
active.
• Lamp cover is not securely
attached.
• Ensure that the LS-10i is
plugged in and that the AC
outlet is active.
• Securely attach the lamp
cover.
The projector does not turn
back on after it was powered
off.
• The projector will not turn
on for two minutes after
power-off, to protect the
lamp.
• Wait until the LS-10i
completes its cool-down
(POWER LED lights solid
green).
The remote control does not
work correctly.
• The batteries have run out. • Replace the batteries.
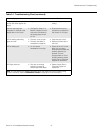
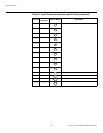
The projector is on and OSD
menus appear, but there is no
video image on-screen.
• Incorrect source selection.
• Source component is not
turned on.
• Source component is
connected incorrectly or
not at all.
• Select the correct source.
• Turn on the source.
• Check cable connection
from source component to
projector.
A projected image from a
DVD is split or otherwise
scrambled.
• DVD player is connected
to the Component input
and set to progressive
scan mode.
• Turn off progressive scan
on the DVD player.
Image is blurred. • The lens is not correctly
focused.
• Adjust the focus.
Image geometry is incorrect. • Incorrect aspect ratio
selection.
• Select the aspect ratio that
best matches the source
image and screen size
(refer to Table 4-2).
Images from an HDMI source
do not display.
• The resolution and
frequency of the video
card in the computer are
not compatible with the
LS-10i.
• HDMI cable from source to
LS-10i is either defective
or too long.
• Select a compatible
resolution and vertical
frequency (refer to
Supported Timings on
page 93).
• Try a known-good and/or
shorter HDMI cable.
Image is too bright and/or
lacks definition in the bright
areas of the image.
• Contrast is set too high. • Lower the contrast setting.
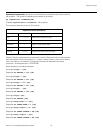
Note: You can obtain more detailed information about the cause of the error condition using
RS-232 commands. Refer to RS-232 Error Codes on page 86 for more information.