


Installation
Runco LS-10i Installation/Operation Manual 41
PRE
L
IMINAR
Y
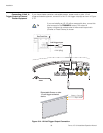
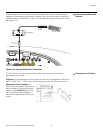
7. Select the Cinema aspect ratio to move the anamorphic lens into position, if it isn’t
already. To do this, press CINEMA on the LS-10i remote control (refer to LS-10i
Remote Control on page 9).
Adjusting the Lens Position:
1. Adjust the vertical position and tilt of the lens so that the projector beam is passing
through the center of the lens and any residual pincushion distortion is about the
same at the top and bottom of the image. This typically results in the anamorphic lens
being below the center of the primary lens and tilted slightly downward.
2. Tighten the knobs.
3. Adjust the rotation of the Lens Transport Assembly so that the left and right sides of
the image are an equal distance from their respective screen borders.
4. Tighten the Pivot Screw and the four mounting screws holding the transport to the
Attachment Plate.
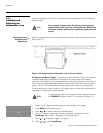
5. For optimum multiple aspect ratio performance, adjust the projector’s zoom so that a
1.85:1 aspect ratio movie is just masked by the top and bottom of the screen border
when the anamorphic lens is not in front of the primary lens. This way 1.85:1, 16:9
and 2.35-2.4:1 aspect ratio movies are all presented to fill the screen at a constant
height.
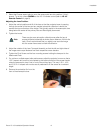
6. Remove the protective film from the
front of the anamorphic lens.
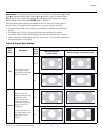
There may be some pincushion distortion even after the lens is
properly adjusted, especially at shorter throw distances. If this is the
case, Runco recommends that you slightly over-scan the image
into the screen frame area to mask the distortion.
Note