


Operation
Runco LS-10i Installation/Operation Manual 45
PRE
L
IMINAR
Y
4.5
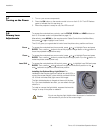
Using the On-Screen
Menus
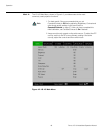
1. Press the MENU button on the remote control or system keypad to display the Main
Menu.
2. There are six menus. Press or to select a sub-menu.
3. Press or to select a sub-menu item.
4. For each sub-menu item, the currently-selected value appears in white text or is
otherwise highlighted. Press or to choose a setting for that item, or press
ENTER to go to another sub-menu.
5. Press MENU to return to the previous menu.
6. From the Main Menu, press MENU to turn off the OSD menu.
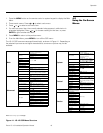
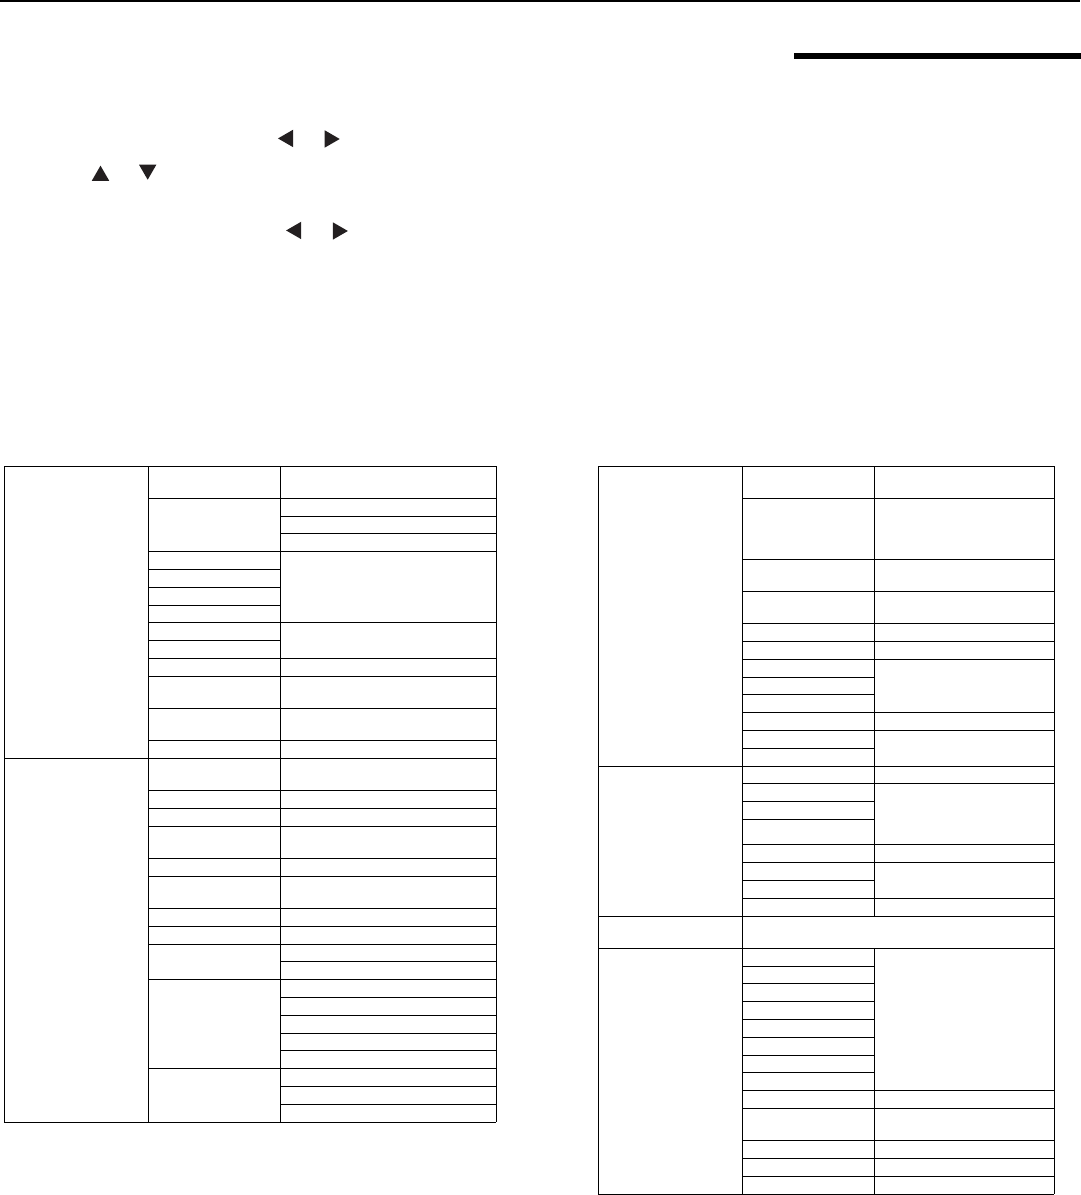
The LS-10i OSD menus are arranged hierarchically, as shown in Figure 4-1. Depending on
the selected input source and signal characteristics, some menu options may not be
available.
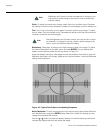
Figure 4-1. LS-10i OSD Menu Structure
Main
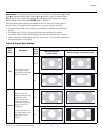
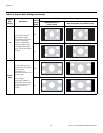
Aspect Ratio
16:9, 4:3, Letterbox, VirtualWide,
Cinema or Virtual Cinema
Memory
Recall Memory
Save Settings
Save ISF
Brightness
0, 1, 2 ... 100
Contrast
Color
Tint
Sharpness
0, 1, 2 ... 100
Noise Reduction
Overscan Off, Crop or Zoom
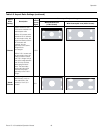
Input Select
HDMI 1, HDMI 2, RGB, Comp. 1,
Comp. 2, Video, S-Video or SCART
PIP Select
Off, HDMI 1, HDMI 2, RGB, Comp. 1,
Comp. 2, Video, S-Video or SCART
Resync (press ENTER to execute)
Advanced
Color Space
Auto, REC709, REC601, RGB-PC or
RGB-Video
Video Standard Auto, NTSC, PAL or SECAM
Gamma 2.5, 2.35, 2.2, 2.0 or 1.8
Color Temperature
5500K, 6500K, 7500K, 9300K or
Native
DLP Frame Rate Auto, 48 Hz, 50 Hz or 60 Hz
Color Gamut
Auto, REC709, SMPTE-C, EBU,
Native or PCE
ConstantContrast On or Off
Adaptive Contrast On or Off
RGB Adjust
Red / Green / Blue Offset
Red / Green / Blue Gain
Fine Sync
V. Position
H. Position
Phase
Tracking
Sync Level
PCE
Red x, y / Green x, y / Blue x, y
Yellow x, y / Cyan x, y / Magenta x, y
White x, y
System
Input Enable
Off (SCART) or On (all others)
for each source
PIP Position
Top Left, Top Right, Bottom
Left, Bottom Right,
Picture-by-Picture or
Split Screen
Menu Position
Top Left, Top Right, Bottom
Left, Bottom Right or Center
Translucent Menu
0% (opaque), 25%, 50% or
75%
Lamp Power Economy or Standard
Blank Screen Black, Blue or White
Auto Power Off
On or OffAuto Power On
Rear Projection
Ceiling Mode Auto, On or Off
Logo Display
On or Off
Power On Chime
Control
Lens Control Focus, Zoom, Lens Shift
HD 1 Key HDMI 1, HDMI 2, RGB (HD 3),
Comp. 1 (HD 1), Comp. 2
(HD 2), Video, S-Video, SCART
or PIP
HD 2 Key
HD 3 Key
CineWide Off, CineWide or AutoScope
Trigger 1
AutoScope (Trigger 2), Lamp
(Trigger 1), 4:3 or RS-232
Trigger 2
HDMI CEC On or Off
Language
English, French, German, Italian, Spanish, Swedish,
Portuguese or Russian
Service
Model Name
(read-only)
Unit Serial Number
Software Version
Active/PIP Source
Pixel Clock
Signal Format
H/V Refresh Rate
Lamp Hours
Lamp Hour Reset Reset? (Yes or No)
Factory Reset
Reset Everything?
(Yes or No)
Blue Only On or Off
Test Patterns On or Off
Altitude Auto or High
Note: Default settings appear in bold type.