


12
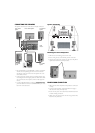
3. Select the channel on your TV corresponding to the VIDEO IN
jack that the unit is connected to. See TV User guide for more
information.
4. If you have connected the unit successfully,
ß
appears on
your TV screen.
ADJUSTING THE SOUND
To adjust the sound balance while Pro Logic decoding is in effect,
use the remote control to make the following changes:
Front speaker (left) — Press
SOUND repeatedly until LEFT appears.
Press d
or e to adjust the sound level.
Front speaker (right) — Press
SOUND repeatedly until RIGHT
appears. Press d
or e to adjust the sound level.
Center speaker — Press
SOUND repeatedly until CENTER appears.
Press d
or e to adjust the sound level.
Rear speaker (left) — Press
SOUND repeatedly until REAR L appears.
Press d
or e to adjust the sound level.
Rear speaker (right) — Press
SOUND repeatedly until REAR R
appears. Press d
or e to adjust the sound level.
Subwoofer — Press
SOUND until WOOFER appears. Press d or e to
adjust the sound level.
Adjusting Sound Quality
Press SOUND to select an equalization mode (BASS or TREBLE).
Bass and treble control the sound from the front left and right
speakers. Press d
or e to adjust the sound level.
BASS — the low range of sounds
TREBLE — the high range of sounds
Movie Mode
The Movie mode in Pro Logic II is very similar to that of the original
Pro Logic decoder. The main difference is that it has stereo surround
channels and no surround filter, unlike Pro Logic which has a mono
surround channel and a 7 kHz surround filter. Movie mode is the
standard required for all A/V systems. When an auto sound unit has
a video screen, it is also considered an A/V system. It can be called
simply "Pro Logic II".
Music Mode
The Music mode offers users some flexibility to control the end
results to their own taste. Music mode should not be used with THX
audio processing mode. Music mode is recommended as the
standard mode for auto sound music systems (without video) and is
optional for A/V systems. It is recommended that Music mode be
identified as the "Music" version of Pro Logic II, to distinguish it
from the Movie mode.
Pro Logic Emulation Mode
The Pro Logic emulation mode offers users the same robust surround
processing as original Pro Logic, in case the source content is not of
optimum quality, or if there is a desire to hear the program more "as
it used to be". When this mode is used, it is called Pro Logic. There is
no "Pro Logic I" mode. The Pro Logic emulation mode is optional.
Dolby does not require PLII products to use the original Pro Logic
decoding algorithm. However, if the DSP contains the original Pro
Logic code, and if the product maker would like to use it, this is
quite acceptable and even encouraged. A product must not offer
both original Pro Logic and the Pro Logic emulation mode.
Matrix Mode
The Matrix mode is the same as the Music mode except that the
directional enhancement logic is turned off. It may be used to
enhance mono signals by making them seem "larger". The Matrix
mode may also find use in auto systems, where the fluctuations from
poor FM stereo reception can otherwise cause disturbing surround
signals from a logic decoder. The ultimate "cure" for poor FM stereo
reception may be simply to force the audio to mono.
Manufactured under license from Dolby Laboratories.
'Dolby' , 'Pro Logic' and
¯
are trademarks of Dolby Laboratories.
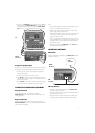
SELECTING THE LISTENING CHANNEL
1. When the disc is stopped, press 5.1 / 2.1 CHANNELS on the
remote control to select different speaker output.
2. While in AV IN mode, press
PRO LOGIC II repeatedly on the
remote control to select PRO LOGIC II (LED on the front panel
illuminates).
Note: 2.1CH corresponds to the audio/sound output from the front
left and front right speakers plus the subwoofer.
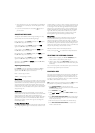
PLAYING A DISC
This owner’s manual explains the basic instructions of this DVD unit.
Some DVD discs are produced in a manner that allows specific or
limited operation during playback. As such, the DVD unit may not
respond to all operating commands. This is not a defect in the DVD
unit. Refer to the instruction notes of discs.
? may appear on the TV screen during operation. A ? means that
the operation is not permitted by the DVD unit or the disc.
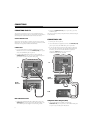
1. Press
POWER/STANDBY on the front panel or press
STANDBY/ONº on the remote control to turn on the unit while
the unit is at standby mode.
2. Press
FUNCTION to select DVD mode.
3. When Load or NO DISC appears, press
OPEN / CLOSE. The disc
tray opens.
4. Press
DISC1/DISC2/DISC3/DISC4/DISC5 on the remote control.
The disc tray will automatically close, open, and automatically
rotate one cycle and stop.
5. Place the first disc on the disc holder with the label side up.
6. Press
DISC1/DISC2/DISC3/DISC4/DISC5 to rotate the disc
holder to load other discs.