


Other connections
10
63
En
• Even if you don’t press
CONTROL
above, the system
automatically switches back to the main room
controls.
Note
• Multi-room can’t be used when you’re setting up the
system (from the on-screen
System Setup
menu).
• You won’t be able to switch the main room off
completely unless you’ve switched off the multi-room
control first.
• When the multi-room feature is switched on, you can
also change the sub room input source with the front
panel
MULTI JOG
dial, even when the main unit is in
standby.
• Remote operation may not be possible if direct light
from a strong fluorescent lamp is shining on the IR
receiver remote sensor window.
• The tuner cannot be tuned to more than one station
at a time. Therefore, changing the station in one
room also changes the station in the other room.
Please be careful not to change stations when
recording a radio broadcast.
• The volume levels of the main and sub rooms are
independent.
• When the
MULTI ROOM OUT
jacks are connected to
a sub room amplifier with a remote sensor and
Pioneer
CONTROL
terminals (page 22), both the IR
receiver and the amplifier may receive remote control
commands (making correct operation impossible)
during multi-room operation. In this case, place the
IR receiver and amplifier apart from each other, and
point the remote control directly at the IR receiver
during operation.
• If you don’t plan to use the multi-room feature for
awhile, turn off the power in both the sub and main
rooms. Make sure the
MULTI-ROOM
indicator goes
off.
• The sleep timer affects the sub room when the multi-
room feature is on.
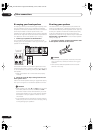
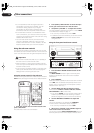
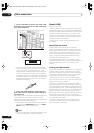
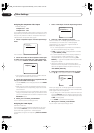
Using the i.LINK interface
VSX-2014i model only
If you have a component with an i.LINK connector, you
can connect it to this receiver using an i.LINK cable.
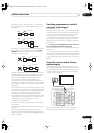
Since the i.LINK interface does not transmit video
signals, the video signal of i.LINK-connected compo-
nents must be connected with other cables (see
Connecting video components
on page 18 for more on
making video connections).
If you’ve already made video connections
from the compo-
nent, assign the i.LINK input to the function (
DVD/LD
, for
example) corresponding to the video inputs to which
you’ve connected (see
Assigning the i.LINK inputs
on
page 68).
The two i.LINK connectors on the rear of your receiver are
4-pin connectors. Use a 4-pin, S400 i.LINK cable to
connect i.LINK-equipped components.
Caution
• If your i.LINK connector comes into contact with
metallic parts of the receiver other than the i.LINK
terminal, an electrical short may occur. Some cables
have metal parts that may touch the unit when
connected. Please take care to use a suitable i.LINK
cable only.
Important
• Please use 4-pin, S400 cables less than 3.5 meters
long. Although longer ones are available, they may
not work reliably.
• There may be cases where the PQLS/rate control
function and/or the i.LINK audio does not work prop-
erly even when connected to i.LINK-compatible
equipment.
• Do not connect/disconnect i.LINK cables or switch
on/off any components connected using i.LINK when
the receiver is on.
• Copy-protected 96kHz DVD-Video discs can be heard
through the i.LINK connection, but they will be down-
sampled to 48kHz.
VSX_2014TX.book.fm Page 63 Wednesday, June 2, 2004 5:21 PM