6
RQT9129
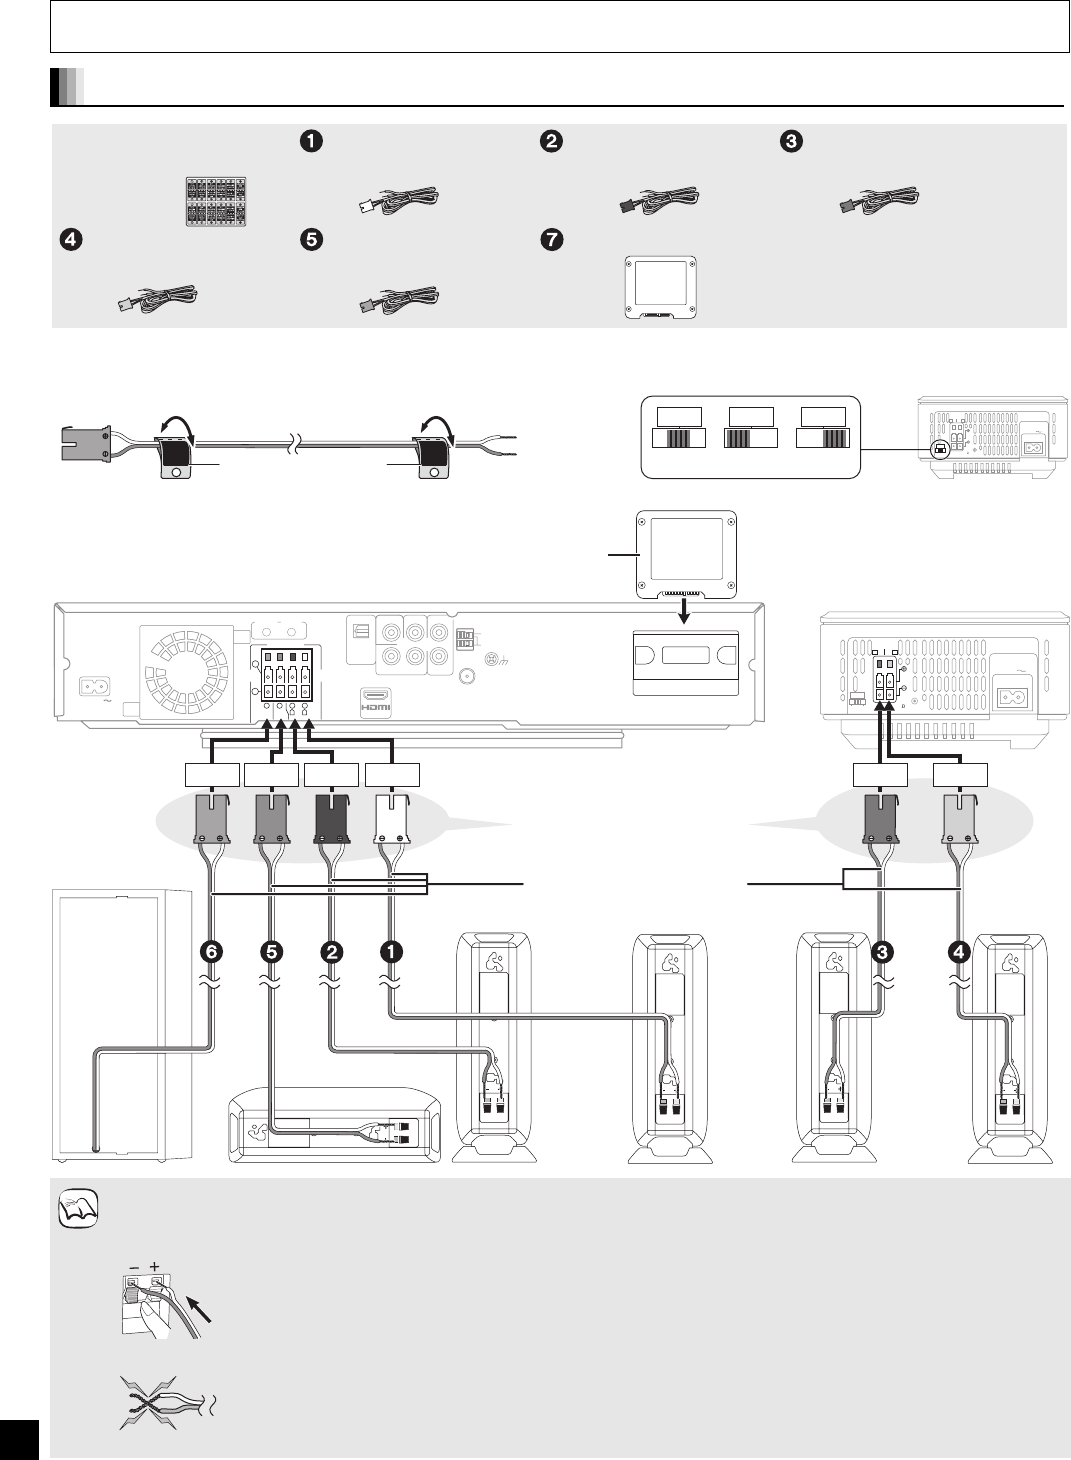
STEP 2 Basic connections
Preparation
∫ Attach the speaker cable stickers to make connection
easier.
∫ Set the surround selector at the rear of the wireless
system to its center.
≥Do not place the unit on amplifiers or equipment that may become hot. The heat can damage the unit.
≥Turn off all equipment before connection and read the appropriate operating instructions.
Speaker cables and transmitter connection
Digital transmitter
Speaker cable for front
speaker (L) (White)
Speaker cable for front
speaker (R) (Red)
Speaker cable for surround
speaker (L) (Blue)
Speaker cable for center
speaker (Green)
Speaker cable for surround
speaker (R) (Grey)
Sheet of speaker cable
stickers
5
CENTER
5
CENTER
e.g., Center speaker
Speaker cable sticker
(included)
AC I
N
SPEAKERS
NCEINTES
LS / RB LB / RS
SURROUND (3 – 6 )
AMBIOPHONIQUES
SURR
L
SIDE
R
SIDE
I/D SET
SURRSURRSURR
Do
Do not
Do not
≥Do not use a front speaker as a surround speaker or vice versa. Verify the type of speaker with the label on the rear of the
speaker.
≥Do not insert or remove the digital transmitter while the main unit is on.
≥Insert the wires fully.
≥Be careful not to cross (short-circuit) or reverse the polarity of the speaker wires as doing so may damage the speakers.
OPTICAL IN
L
R
DIGITAL
COMPONENT
VIDEO OUT
VIDEO OUT
Y
AUXP
R
PB
SPEAKERS
SURROUND
SURROUND
BACK
FM ANT
ANT
EXT
LOOP
AM
75ǡ
AV OUT
R
L
6
ǡ
6
ǡ
CENTER
6
ǡ
SUBWOOFER
FRONT
6
5
2
1
GND
ANT
LOOP
AC IN
TRANSMITTER
DIGITAL
AC I
N
SPEAKERS
EN
CEI
N
TES
LS / RB LB / RS
SURROUND (3 – 6 )
AMBIOPHO
NIQUES
SURR
L
SIDE
R
SIDE
I/D SET
OUT
SurroundSurround
Front
Center
Front
7 Digital transmitter
Connect to the terminals of the
same color.
Blue Grey
White
Red
GreenPurple
Wireless system
Main unit
Subwoofer
Center speaker
Front speaker (R) Front speaker (L)
Speaker cables (included)
Surround
speaker (L)
Surround
speaker (R)
Insert fully until you
hear a click.
NOTE
Push!
i: White
j: Blue
Do not
SC-BT100P-ENG.book 6 ページ 2008年2月20日 水曜日 午後6時22分


