


82
Net-Tune
—Continued
2
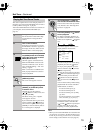
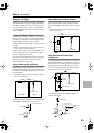
This section explains how to manually configure the
TX-NR901’s network settings.
If your router’s DHCP server is enabled, by default the
TX-NR901 is set use DHCP to configure itself automat-
ically (i.e., the DHCP/AUTO IP setting is On), so you
don’t need to change any of the settings on the
“5. Network Setup” menu. If your router’s DHCP server
is disabled, for example, you’re using static IP addresses,
you’ll need to configure these settings yourself. A
knowledge of Ethernet networking is essential.
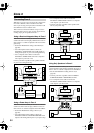
What’s DHCP/AutoIP?
DHCP (Dynamic Host Configuration Protocol) and Auto
IP (Automatic IP Addressing) are services used by rout-
ers, computers, the TX-NR901, and other devices to
automatically configure themselves on the network.
What’s DNS?
The DNS (Domain Name System) translates domain
names into IP addresses. For example, when you enter a
domain name such as
www.onkyousa.com
in your Web
browser, before accessing the site, your browser uses
DNS to translate this into an IP address, in this case
63.148.251.142.
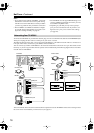
Network Settings
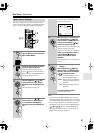
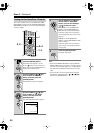
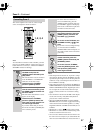
1
Press the [INPUT] button, and
then roll the scroll wheel to select
either “IRD” or “MSRV.”
2
Press the scroll wheel, and then
press the [SETUP] button.
If the Basic menu appears, use the
Down [ ] button to select Advanced
Menu, and press the [ENTER] button to
display the Advanced menu.
--
/
---
@.
-
'
/ ABC DEF
PQRS TUV WXYZ
DIRECT TUNING
GHI JKL MNO
CUSTOM
DISPLAY
DIMMER
T
V
INPUT
SLEEP
RANDOMREC
STEP
/
SLOW
MUTING
ENTER
LAST MANGLE
SUBTITLE
AUDIO
TV CH
TV VOL
A
U
D
I
O
A
D
J
E
X
I
T
G
U
I
D
E
+
10 0
CLEAR
123
456
789
T
O
P
M
E
N
U
M
E
N
U
S
E
T
U
P
R
E
T
U
R
N
ZONE
2
INPUTMODE
MACRO
VOL
CH
DISC
SURR
STEREO
THX All ST
+
-
+
-
1, 2
2, 7
3–6
3, 4, 6
1
INPUT
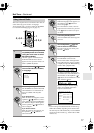
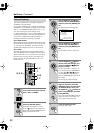
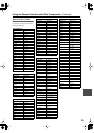
3
Use the Up/Down [ ]/[ ] but-
tons to select “5. Network Setup,”
and then press the [ENTER] but-
ton.
The Network Setup menu appears.
4
Use the Up/Down [ ]/[ ] but-
tons to select the menu items,
and then press the [ENTER] but-
ton.
The IP Address menu is shown here.
5
Use the Up/Down [ ]/[ ] but-
tons to select the settings, and
use the Left/Right [ ]/[ ] but-
tons to set them.
To enter an IP address, select the set-
ting, and then press the [ENTER] but-
ton. The [ ]/[ ]/[ ]/[ ] buttons
can then be used to enter numbers.
Press the [ENTER] button again to set
the number.
The settings are explained below.
6
When you’ve completed the set-
tings on any menu, press the
[RETURN] button to return to the
“5. Network Setup” menu, use
the Up/Down [ ]/[ ] buttons to
select “Save Settings,” and then
press [ENTER].
Don’t turn off the TX-NR901 while the
settings are being saved (about 2 sec-
onds), otherwise they’ll be lost.
7
Press the [SETUP] button.
The setup menu closes.
ENTER
ENTER
5.Network Setup
1.IP Address
3.MAC Address
4.Client Setup
2.Proxy Setup
[ENTER]Quit:[SETUP]
Save Settings
→
ENTER
ENTER
ENTER
ENTER
ENTER