


10
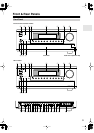
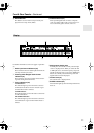
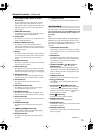
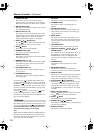
Front & Rear Panels
—Continued
For detailed information, refer to the pages in parenthe-
sis.
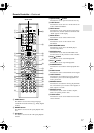
A
POWER switch (38)
American and Australian models don’t have this
switch.
This is the main power switch. When set to OFF, the
TX-NR901 is completely shutdown. When set to
ON, the TX-NR901 is in Standby mode and the
STANDBY indicator lights up.
Don’t turn on the power until you’ve completed,
and double checked all connections.
B
STANDBY/ON button (37)
This button is used to set the TX-NR901 to On or
Standby. For models with a POWER switch, this
button has no effect unless the POWER switch is set
to ON.
C
STANDBY indicator (38)
This indicator lights up when the TX-NR901 is in
Standby mode, and it flashes while a signal is being
received from the remote controller.
D
AUDIO SELECTOR button (53)
This button is used to select the audio input signal
format: analog, digital, or multichannel.
E
Input selector buttons & indicators (51)
These buttons are used to select the following input
sources: DVD, VIDEO 1–5, TAPE, TUNER,
PHONO, CD, and NET AUDIO. The indicators
show the currently selected input source.
The indicators also show which input source is
selected for Zone 2, in which case they light up
green, or which input source is selected for record-
ing (REC OUT), in which case they light up red.
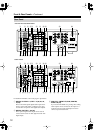
F
Display
See “Display” on page 11.
G
Remote-control sensor (8)
This sensor receives control signals from the remote
controller.
H
DISPLAY button (61)
This button is used to display various information
about the currently selected input source.
I
MASTER VOLUME control (51)
This control is used to set the volume of the
TX-NR901 from 0 to 100.
J
DIRECT/PURE AUDIO button (59)
This button is used to select the Direct or Pure
Audio listening modes.
K
PURE AUDIO indicator (59)
This indicator lights up when the Pure Audio listen-
ing mode is selected.
L
UPSAMPLING indicator (69)
This indicator lights up when the Upsampling func-
tion is on.
M
PHONES jack (52)
This 1/4-inch phone jack is for connecting a stan-
dard pair of stereo headphones for private listening.
N
ZONE 2 LEVEL [ ] [ ] buttons (87)
These buttons are used to set the volume for Zone 2.
O
REC OUT button (65)
This button is used to select the input source that
you want to record via the REC OUTs (i.e., TAPE
OUT, VIDEO 1 OUT, VIDEO 2 OUT).
P
ZONE 2 button (87)
This button is used to select the input source for
Zone 2.
Q
OFF button (65, 87)
This button is used to turn off the REC OUTs (i.e.,
TAPE OUT, VIDEO 1 OUT, VIDEO 2 OUT) or
Zone 2.
R
STEREO button (59)
This button is used to select the Stereo listening
mode.
S
SURROUND button (59)
This button is used to select the Dolby and DTS lis-
tening modes.
T
THX button (59)
This button is used to select the THX listening
modes.
U
DSP [ ] [ ] buttons (59)
These buttons are used to select the DSP (digital
signal processor) listening modes.
V
DIMMER button (52)
This button is used to adjust the display brightness.
W
MEMORY button (54)
This button is used when storing and deleting radio
presets.
X
FM MODE button (54)
This button is used to select the FM radio Auto and
Mono modes.
Y
SETUP button
This button is used to access the onscreen setup
menus (OSD) that appear on the TV.
Z
TUNING [ ] [ ] buttons (54)
These buttons are used to tune into radio stations
and to select items on the onscreen setup menus
(OSD).
a
ENTER button
This button is used when navigating the onscreen
setup menus (OSD), entering names, and confirm-
ing settings.
b
PRESET [ ] [ ] buttons (54)
These buttons are used to select radio presets and to
select items on the onscreen setup menus (OSD).