


23
Connecting the TX-NR901
—Continued
Read the following before connecting your speakers:
• Disconnect the power cord from the wall outlet.
• Read the instructions supplied with your speakers.
•Pay close attention to speaker wiring polarity. In other
words, connect positive (+) terminals to only positive
(+) terminals, and negative (–) terminals to only nega-
tive (–) terminals. If you get them the wrong way
around, the sound will be out of phase and will sound
unnatural.
• Only connect speakers with an impedance of between
4 and 16 ohms. If the impedance of any one speaker is
between 4 and 6 ohms, be sure to select the 4 ohms
setting on the TX-NR901 (see page 40).
• Unnecessarily long, or very thin speaker cables may
affect the sound quality and should be avoided.
• Be careful not to short the
positive and negative wires.
Doing so may damage the
TX-NR901.
• Don’t connect more than one
cable to each speaker termi-
nal. Doing so may damage the
TX-NR901.
• If you want to connect a single speaker instead of a
pair, don’t connect it to the left and right terminals.
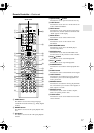
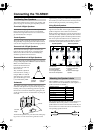
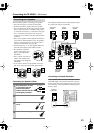
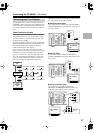
Connecting the Speaker Cables
The following illustration shows which speaker should
be connected to each pair of terminals.
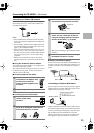
Connecting a Powered Subwoofer
Using a suitable cable, connect the TX-NR901’s PRE
OUT SUB output to the powered subwoofer’s input, as
shown. If your subwoofer is unpowered and you’re using
an external amp, connect the PRE OUT SUB output to
the amp’s input.
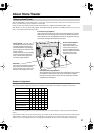
Connecting Your Speakers
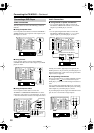
1
Strip about 5/8" (15 mm)
of insulation from the
ends of the speaker
cables, and twist the bare
wires tightly, as shown.
2
Unscrew the terminal.
3
Fully insert the bare
wires.
4
Screw the terminal tight.
RL RL
5/8" (15 mm)
SURR
BACK
ZONE 2
SPEAKERS
FRONT SPEAKERS
L
RL
R
SURR SPEAKERS
CENTER
SPEAKER
R
L
Surround
back left
speaker
Surround
back right
speaker
Front left
speaker
Front right
speaker
Center
speaker
Surround
right
speaker
Surround
left
speaker
OUT
OUT
OUT
OUT
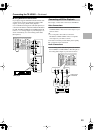
L
PHONO
DIGITAL
IN
PRE OUT
DIGITAL
OUT
OPT
OPT
2
1
2
3
4
1
2
FRONT
SUB
SURR
R
L
AUDIO
R
L
AUDIO
R
L
CD
TAPE
R
L
AUDIO
VIDEO
S VIDEO
MONITOR
OUT
R
L
IN
IN
IN
IN
IN
IN
IN
IN
ZONE 2
DVD
VIDEO 1
VIDEO 2
VIDEO 3
VIDEO 4
AUDIO
AUDIO
VIDEO
S VIDEO
1
3
GND
SURR
BACK/
ZONE 2
R
L
IN
COAX
TUNER
R
CENTER
R
L
MULTI CH
INPUT
FRONT
SUB
SURR
SURR
BACK
CENTER
R
L
LINE INPUT
LINE INPUT
PRE OUT
SUB
Powered
subwoofer