


15
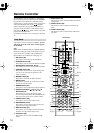
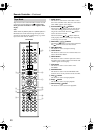
Remote Controller
—Continued
P
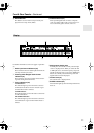
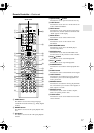
TEST TONE, CH SEL, LEVEL– & LEVEL+
buttons (44)
These buttons are used to adjust the level of each
speaker individually. These functions can be set
only with the remote controller. The [LEVEL–] and
[LEVEL+] buttons are also used to adjust the vol-
ume in Zone 2.
Q
AUDIO SEL button (53)
This button is used to select the audio input signal
format: analog, digital, or multichannel.
R
LIGHT button
This button is used to turn on or off the remote con-
troller’s illuminated buttons.
S
DIRECT TUNING button (54)
This button is used with the number buttons to
select a radio station by entering its frequency. Press
this button first, and then use the number buttons to
enter the frequency.
T
Display
The top line of this LCD display shows the name of
the currently selected input source. The bottom line
shows the currently selected remote controller
mode.
U
ZONE 2 button (87)
This button is used when you want to set the volume
and input source for Zone 2.
V
INPUT button (51)
This button is used to select the input source. Press
this button first, and then roll the scroll wheel until
the name of the input source appears on the display.
W
SLEEP button (52)
This button is used to set the Sleep function. This
function can be set only with the remote controller.
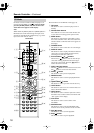
X
VOL button (51)
This button is used to set the volume of the
TX-NR901.
Y
SETUP/GUIDE button (39)
This button is used to access the onscreen setup
menus (OSD) that appear on the TV.
Z
MUTING button (52)
This button is used to mute the TX-NR901. This
function can be set only with the remote controller.
a
All ST button (59)
This button is used to select the All Ch Stereo listen-
ing mode.
b
STEREO button (59)
This button is used to select the Stereo listening
mode.
c
[ DSP] & [DSP ] buttons (59)
These buttons are used to select the DSP (digital
signal processor) listening modes.
d
Re-EQ button (62)
This button is used to turn on and off the Re-EQ
function.
e
L NIGHT button (62)
This button is used to set the Late Night function.
Net-Tune mode is used with the Net-Tune functions.
To
select Net-Tune mode, press the [MODE] button, and
then roll the scroll wheel until “NET-T” appears on
the display
.
Note:
While neither the [INPUT] button nor [MODE] button is
illuminated, the scroll wheel changes the input source
and remote controller mode simultaneously. (e.g., set the
input source to “MSRV/IRD” and the mode to
“NET-T.”)
1
Number/letter buttons (80)
These buttons are used to enter numbers and letters
when searching for music in your Net-Tune Central
music library.
2
MODE button
This button is used with the scroll wheel to select
the remote controller modes. Press this button first,
and then roll the scroll wheel until “NET-T”
appears on the display.
3
Up/Down/Left/Right [ ]/[ ]/[ ]/[ ] &
ENTER buttons
These buttons are used to navigate Internet radio
and Net-Tune server menus. The ENTER button is
used to confirm items and to start playback of Net-
Tune server tracks.
4
CH/DISC button (78)
This button is used to select Internet radio presets.
5
Play [ ] button (80)
This button is used to start playback of Net-Tune
server tracks.
6
Previous/Next [ ]/[ ] buttons (79)
The Previous [ ] button is used to select the pre-
vious track. During playback it selects the begin-
ning of the current track. The Next [ ] button is
used to select the next track.
7
Pause [ ] button (79)
This button is used to pause playback.
8
REPEAT button (80)
This button is used for repeat playback.
9
ALBUM button (79)
This button is used to search your Net-Tune Central
music library by album.
0
PLAYLIST button (79)
This button is used to search your Net-Tune Central
library by playlist.
Net-Tune Mode
(continued...)