


42
Adjusting the Surround Sounds Temporarily
Activating the THX Surround and conventional Surround mode
for a source automatically recalls the memorized settings and
adjustments done on the Setup and Adjustment Menus.
However, if you want to modify the stored adjustments temporarily
only for the current playback source, you can use the TEST button
and the number buttons on the remote control.
IMPORTANT:
• When using the remote control:
Check the indication shown on the remote’s display when you press
a button—this indicates the remote control operation mode for a
while (10 or 5 seconds).
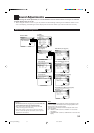
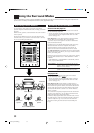
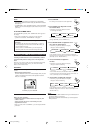
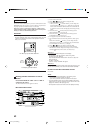
1. Press SOUND.
The 10 keys are activated for sound adjustments.
2. Press TEST once to check the speaker
output balance.
The test tone comes out of all the activated
speakers in the following sequence:
Left front speaker
=
Center speaker
=
Right front speaker
=
Right surround speaker
=
Right surround back speaker
=
Left surround back speaker
=
Left surround speaker
=
Subwoofer
=
(Back to the beginning)
Notes:
• The LEVEL submenu (see page 37) appears on the TV screen.
• If “NO” or “NONE” is selected for a speaker on the SPEAKER
SETTING submenu (page 29), test tone does not come out of
that speaker, and adjustments in the following steps cannot be
made.
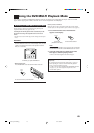
3. Select the speaker you want to adjust.
The selected speaker name appears on the
remote’s display for a while.
• To select the left front speaker, press
FRONT•L.
• To select the center speaker, press CENTER.
• To select the right front speaker, press
FRONT•R.
• To select the right surround speaker, press
SURR•R.
• To select the right surround back speaker, press SURR BK•R.
• To select the left surround back speaker, press SURR BK•L.
• To select the left surround speaker, press SURR•L.
• To select the subwoofer, press SUBWFR.
4. Press LEVEL +/– to adjust the
speaker output levels.
The speaker name selected in the above step
and its level appear on the unit’s display.
• You can adjust the levels as follows:
– Left and right front speakers : –20 dB to +20 dB
– Other speakers : –10 dB to +10 dB
5. Repeat steps 3 and 4 to adjust the other speaker
output levels.
6. Press TEST again to stop the test tone.
TEST
SOUND
STANDBY/ON STANDBY/ON
STANDBY
TV/CATV/DBS
VCR 1
ON
Ex.When you press SOUND.
EFFECT
ROOM SIZE
FM MODE
RETURN
100
+
WALL
LIVENESS
1 2 3
456
7
/P
89
10
+
100
Before you start, remember...
• Adjustments using the number buttons are temporary and
cannot be stored.
When you change the source or turn off the power, the
adjustments are erased.
• Make sure that you have set the speaker information correctly (see
page 29). You cannot select and adjust the output level of the
speaker if the speaker is not activated (set to “NONE” or “NO”)
on the SPEAKER SETTING submenu.
CAUTION:
Test tone is automatically fixed to 0 dB, but this level will be louder
than you would expect.
EN39-46_RX-DP9VBK[J]_f 01.6.14, 9:56 AM42