


8
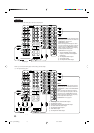
Basic connecting procedure
2
1
3
4
RIGHT
LEFT
R
IG
H
T
L
E
F
T
R
IG
H
T
L
E
F
T
PREOUT
RL
SURR
BACK
SUB
WOOFER
SURR
CENTER
FRONT
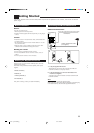
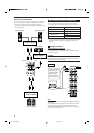
Right surround
back speaker
Left surround
back speaker
Power amplifier
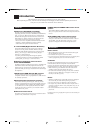
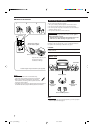
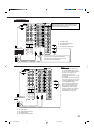
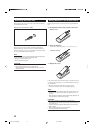
1 Cut, twist and remove the insulation at the end of
each speaker signal cable (not supplied).
2 Turn the knob counterclockwise.
3 Insert the speaker signal cable.
4 Turn the knob clockwise.
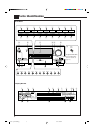
Connecting the surround back speakers
To fully enjoy THX Surround (see page 39), you need to connect
the surround back speakers through an power amplifier
connected to the SURR BACK PREOUT jacks on the rear.
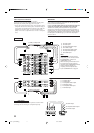
SPEAKER
LOAD SELECTOR
RIGHT
LEFT
+
–
CAUTION :
SPEAKER
IMPEDANCE
816
46
LOW
816
HIGH
FRONT 1 SPEAKERS
FRONT 2 SPEAKERS
SURROUND
SPEAKERS
CAUTION : SPEAKER IMPEDANCE
RIGHT
LEFT
CENTER
SPEAKER
RIGHT
LEFT
Front speakers 1
Front speakers 2
Surround speakers
Center speaker
CAUTION:
Use only the speakers of the SPEAKER IMPEDANCE indicated
by the speaker terminals.
IMPORTANT for the FRONT 1 SPEAKERS
connection:
To obtain the best possible output power from the receiver, and
to prevent the receiver from being overheated, the receiver has
the SPEAKER LOAD SELECTOR which has to be set as
follows:
• Set it to the “HIGH” position when the impedance of the front
speakers connected is within the range of 8 Ω to 16 Ω.
• Set it to the “LOW” position when the impedance of the front
speakers connected is within the range of 4 Ω to 6 Ω.
Connecting the subwoofer speaker
You can enhance the bass by connecting a subwoofer.
Connect the input jack of a powered subwoofer to the
SUBWOOFER PREOUT jack on the rear panel, using a cable
with RCA pin plugs (not supplied).
PREOUT
RL
SURR
BACK
SUB
WOOFER
SURR
CENTER
FRONT
Powered
subwoofer
EN01-15_RX-DP9VBK[J]_f 01.6.14, 9:49 AM8