


19
Activating the Front Speakers
When you have connected two pairs of the front speakers, you can
select which to use.
IMPORTANT:
You can activate two pairs of the front speakers at the same time only
when the SPEAKER LOAD SELECTOR switch on the rear panel is
set to the “HIGH” position and when signals are sent only to the front
speakers. Otherwise, activating one pair of the speakers deactivates
the other.
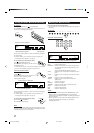
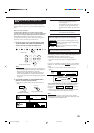
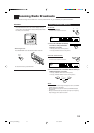
On the unit ONLY:
To use the speakers connected to the FRONT
1 SPEAKERS terminals, press SPEAKERS 1
(inside the front door) so that the speakers 1
indicator lights up on the display. (Make sure
that the front speakers 2 indicator is not lit on the display.)
To use the speakers connected to the FRONT 2 SPEAKERS
terminals, press SPEAKERS 2 (inside the front door) so that the
front speakers 2 indicator lights up on the display. (Make sure that
the front speakers 1 indicator is not lit on the display.)
To use both sets of the speakers, press SPEAKERS 1 and
SPEAKERS 2 so that the front speakers 1 and 2 indicators light up
on the display.
To use neither sets of the speakers, press SPEAKERS 1 and
SPEAKERS 2 so that the front speakers 1 and 2 indicators disappear
from the display.
(“HEADPHONE” appears on the unit’s display).
Note:
In the following cases, the speakers connected to the FRONT 2
SPEAKERS terminals are deactivated even if both pairs of the front
speakers are activated.
– If you select “DVD MULTI” as the source.
– If you select any of the Surround/DSP modes which activates the
center and/or surround speaker(s).
Listening only with headphones:
Sounds through the front speakers and the subwoofer shut off when
connecting a pair of headphones to the PHONES jack.
(“HEADPHONE” appears on the unit’s display.)
You can enjoy the following sounds through the headphones:
• If the Surround mode is activated, you can enjoy surround effect.
(For details, see “3D HEADPHONE Mode” on page 40.)
• If a DSP mode is activated, you can enjoy the DSP effect. (For
details, see “HEADPHONE Mode” on page 44.)
CAUTION:
Be sure to turn down the volume before connecting or putting on
headphones, as high volume can damage both the headphones and
your hearing.
Adjusting the Volume
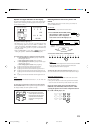
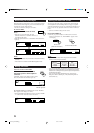
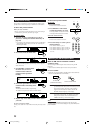
On the unit:
To increase the volume, turn MASTER
VOLUME clockwise.
To decrease the volume, turn it
counterclockwise.
• When you turn MASTER VOLUME
rapidly, the volume level also changes
rapidly.
• When you turn MASTER VOLUME slowly,
the volume level also changes slowly.
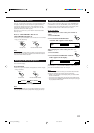
From the remote control:
To increase the volume, press VOLUME +.
To decrease the volume, press VOLUME –.
CAUTION:
Always set the volume to the minimum before starting any source. If
the volume is set at a high level, the sudden blast of sound energy
can permanently damage your hearing and/or ruin your speakers.
Notes:
• The volume level can be adjusted within the range of “– – – dB”
(minimum) to “+18.0 dB” (maximum).
• If you set One Touch Operation to “ON” (see page 33), you do not
have to adjust the volume level each time you change the source. It
is automatically set to the stored level.
(However, if you have turned off the receiver with the volume level
set at more than level “–35 dB,” the volume level will be
automatically set at level “–35 dB” next time you turn on the
receiver.)
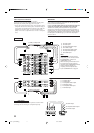
Down
MASTER VOLUME
Up
VOLUME
SPEAKERS 1
SPEAKERS 2
EN16-23_RX-DP9VBK[J]_f 01.6.21, 4:51 PM19