


38
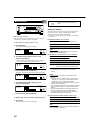
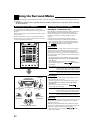
Setting the Zone 2/Speakers 2
You can select the usage of the speaker connected to the
FRONT2/ZONE2 SPEAKERS terminals.
7
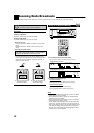
FRONT2/ZONE2 SPEAKERS terminal usage
—FRONT SPEAKER2
Select one of the following:
FRONT SPK2: SPK2 Select when connecting the second
Zone 1 front speakers.
FRONT SPK2: ZONE2 Select when connecting the Zone 2
front speakers.
Note:
When connecting the Zone 2 front speakers to the ZONE 2
PREOUT jacks through another amplifier (see “Connection
Å
" on
page 16), no settings are required on this receiver.
Memorizing the volume level for each source
This unit memorizes some settings separately for each source (see
page 25).
In addition, you can store the volume level for each source with the
other memorized settings—One Touch Operation.
• This receiver memorizes the volume level—
– when you turn off the power,
– when you change the source,
– when you press ZONE 1 ON/OFF or ZONE 2 CONTROL, and
– when you change the source name.
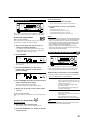
7
One Touch Operation—ONE TOUCH OPE
Select one of the following:
ONE TOUCH: ON Select to store the volume level
separately for each source. (The ONE
TOUCH OPERATION indicator lights
up on the display.)
ONE TOUCH: OFF Select this not to store the volume level.
To recall the volume level
With the ONE TOUCH OPERATION indicator lit, the volume
level for the currently selected source is recalled when the
source is selected.
To cancel the One Touch Operation
Set One Touch Operation to “ONE TOUCH: OFF” so that the
ONE TOUCH OPERATION indicator goes off from the display.
Note:
If you have turned off the receiver with the volume level set at
more than level “30,” the volume level will be automatically set at
level “30” next time you turn on the receiver.
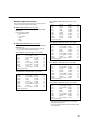
Setting the component video input
When you use the component video inputs for connecting the DVD
player and/or DBS tuner (or VCR), register the type of input jacks.
If you have not selected appropriate video input jacks, the AV
COMPU LINK remote control system cannot operate properly (See
page 53) and you cannot see playback picture of those video
components.
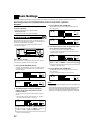
7
For the DVD player—VIDEO IN DVD
Select one of the following:
VIDEO DVD: CMPNT Select when connecting the DVD
player to the component video input
jacks.
VIDEO DVD: S/C Select when connecting the DVD
player to the composite video or
S-video input jacks.
7
For the DBS tuner—VIDEO IN DBS
Select one of the following:
VIDEO DBS: CMPNT*
1
Select when connecting the DBS
tuner to the component video input
jacks.
VIDEO DBS: S/C Select when connecting the DBS
tuner to the composite video or
S-video input jacks.
Note:
*
1
When you have selected this setting, you cannot select “VIDEO
VCR1: CMPNT” for “VIDEO IN VCR1.” Then “VIDEO VCR1: S/C”
is applied for “VIDEO IN VCR1” setting.
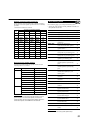
7
For the VCR—VIDEO IN VCR1
Select one of the following:
VIDEO VCR1: CMPNT*
2
Select when connecting the VCR 1
to the component video input jacks.
VIDEO VCR1: S/C Select when connecting the VCR 1
to the composite video or S-video
input jacks.
Note:
*
2
When you have selected this setting, you cannot select “VIDEO
DBS: CMPNT” for “VIDEO IN DBS.” Then “VIDEO DBS: S/C” is
applied for “VIDEO IN DBS” setting.