15
Notes:
• The signal-reachable distance may differ depending on the
operating conditions and circumstances. To improve transmitting
conditions, change the distance to the receiver and the direction to
transmit while operating the remote control.
• To avoid a failure in the reception from the remote control, keep the
connecting cables and the IR signal transmitter’s cable away from
the RF rod antenna.
Setting up the IR signal transmitter
The IR signal transmitter can retransmit the IR signals. The
transmitter allows you to use the AV COMPULINK remote control
system, and to operate other manufacturers’ components without
aiming the remote control directly at the remote sensors on the target
components. In addition, the IR signal transmitter reduces the
possibility of malfunction.
• The IR signal transmitter may not operate the target components
depending on the operating conditions and circumstances—
including the aiming angle and direction of the IR signal
transmitter at the remote sensors of the target components. If this
occurs, changing its aiming angle and direction at the remote
sensors may solve the problem.
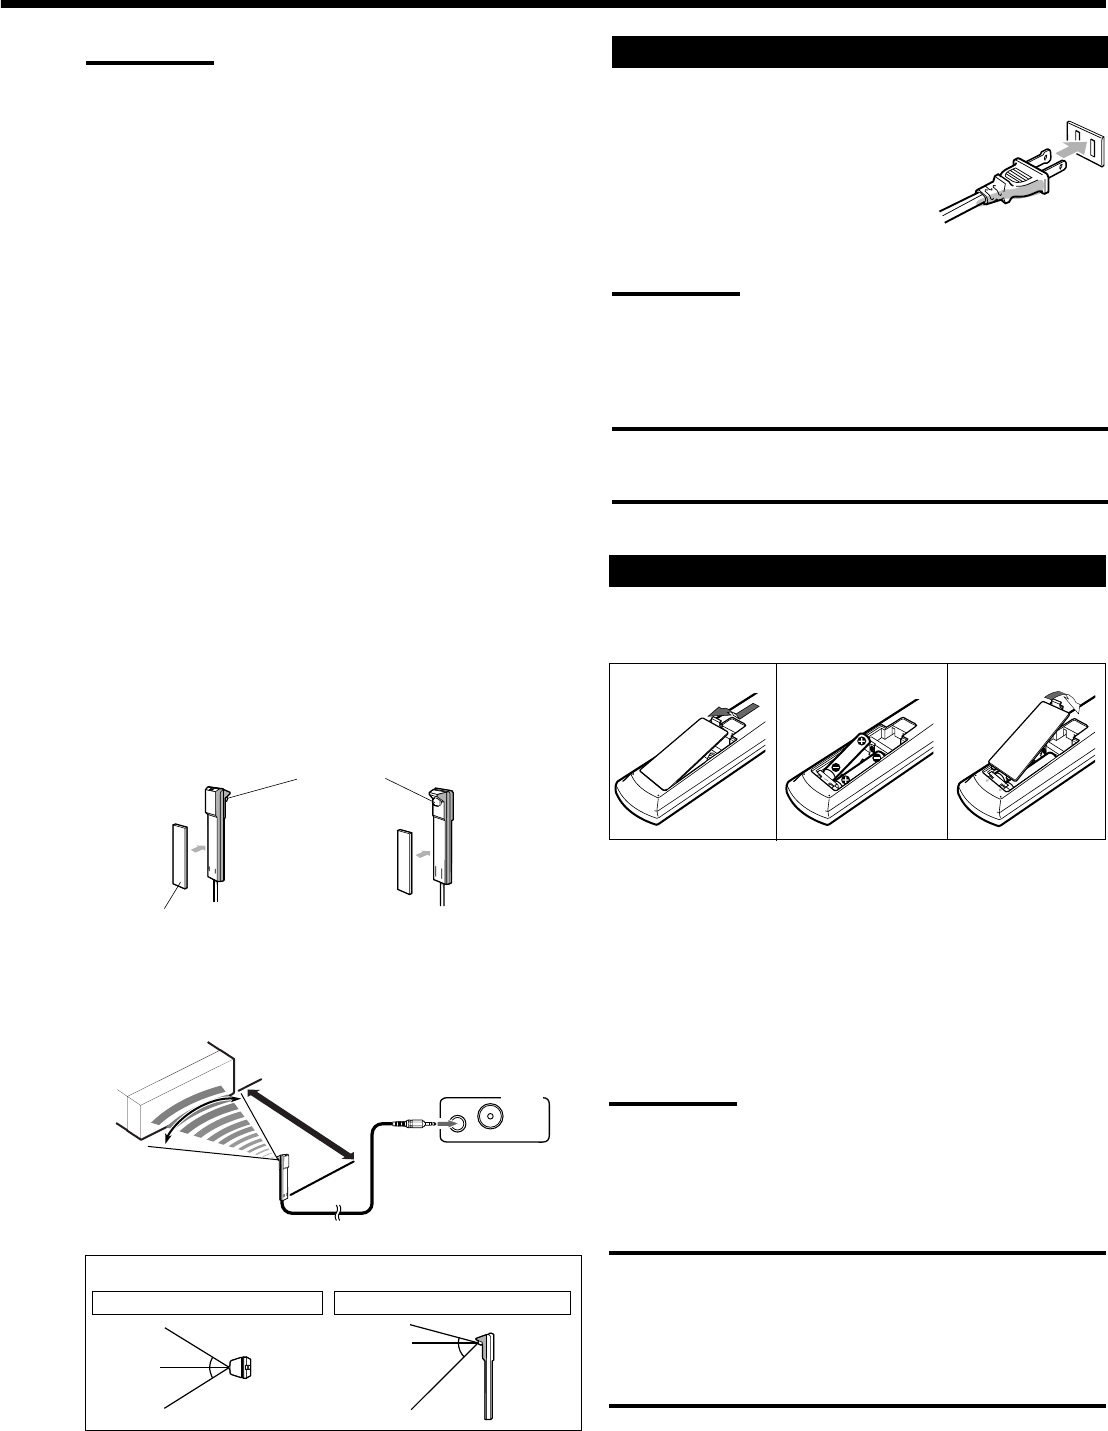
1. Find a place where you can attach the IR signal
transmitter.
• Place the transmitter where the signal can reach the remote
sensor of the target components in a direct line of sight.
• If the cord length of the IR signal transmitter is not long
enough, use an extension cord (not supplied).
2. Attach the double-sided adhesive tape (supplied)
to the IR signal transmitter.
3. Connect the plug of the transmitter to the IR OUT
terminal of the receiver and attach the transmitter.
IR Signal Transmitter
Double-sided
Adhesive Tape
or
Horizontally: 60˚
Vertically: 60˚
Signal-emitting angle of the transmitter
Target component(s)
RF REMOTE
ANTENNA
IR OUT
Less than 3 m (10 feet)
At an angle of
approx. 60°
30°
30°
15°
45°
Putting Batteries in the Remote Control
Before using the remote control, insert the two supplied batteries
first.
1. On the back of the remote control, remove the
battery cover.
2. Insert the batteries.
• Make sure to match the polarity: (+) to (+) and (–) to (–).
3. Replace the cover.
If the remote control cannot transmit signals or operate the receiver
correctly, replace the batteries. Use two R6(SUM3)/AA(15F) type
(alkaline) dry-cell batteries.
Notes:
• When you aim the remote control directly at the remote sensor on
the receiver, you can operate the receiver at a distance of up to 7 m
(23 feet).
• After replacing the batteries, set the manufacturers’ codes again
(see pages from 59 to 62).
CAUTIONS:
Follow these precautions to avoid leaking or cracking cells:
• Place batteries in the remote control so they match the polarity:
(+) to (+) and (–) to (–).
• Use the correct type of batteries. Batteries that look similar may
differ in voltage.
• Always replace both batteries at the same time.
• Do not expose batteries to heat or flame.
1
2
R6(SUM3)
/AA(15F)
3
Connecting the Power Cord
Before plugging the receiver into an AC outlet, make sure that all
connections have been made.
Plug the power cord into an AC outlet.
Keep the power cord away from the
connecting cables and the antenna. The
power cord may cause noise or screen interference.
Note:
The preset settings such as preset channels and sound adjustment
may be erased in a few days in the following cases:
– When you unplug the power cord.
– When a power failure occurs.
CAUTIONS:
• Do not touch the power cord with wet hands.
• Do not pull on the power cord to unplug the cord. When unplugging
the cord, always grasp the plug so as not to damage the cord.


