


104
Controlling Other Components
—Continued
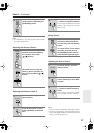
T
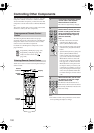
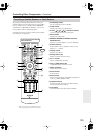
Play Mode button
Selects play modes on components with selectable
play modes.
U
CLR button
Cancels functions and clears entered numbers.
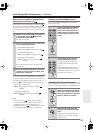
Note:
• If you enter the remote control code for a HD DVD or
Blu-ray player that has A, B, C, and D or colored but-
tons, the [SEARCH], [REPEAT], [RANDOM], and
[PLAY MODE] buttons will work as colored or A, B,
C, D buttons. In this case, these buttons cannot be used
to set repeat playback, random playback, or select play
modes.
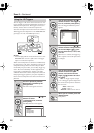
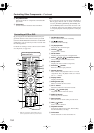
By pressing the Remote Mode button that’s been pro-
grammed with the remote control code for your VCR
(TV/VCR, DVR, DBS/DVR combination or cable/DVR
combination), you can control your video recorder with
the following buttons.
For details on entering a remote control code for a differ-
ent component, see page 100.
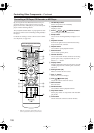
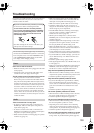
A
On/Standby button
Set the video recorder to On or Standby.
B
TV [ ] buttons
Set the TV to On or Standby.
C
TV [Input] button
Selects the TV’s external inputs.
D
TV VOL [ ]/[ ]
Adjust the TV’s volume.
E
Guide button
Displays the program guide or navigation list.
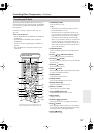
F
Arrow [ ]/[ ]/[ ]/[ ] and Enter buttons
Used to navigate menus and select items.
G
Setup button
Displays the video recorders setup menu.
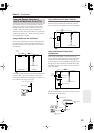
H
Previous [ ] button
Previous or instant replay function.
I
Number buttons
Enter numbers. The [0] button enters 11 on some
components. The [+10] button works as a +10 but-
ton or “-.--” button.
J
Display button
Displays information.
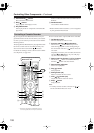
K
Muting button (49)
Mutes or unmutes the AV receiver.
L
CH +/– button
Selects TV channels on the video recorder.
M
VOL [ ]/[ ] button (48)
Adjusts the volume of the AV receiver.
N
PREV CH button
Selects the previous channel.
O
Return button
Exits the menu or returns to the previous menu.
P
Next [ ] button
Next or advance function.
Q
Playback buttons
From left to right: Previous, Next, Rewind, Play,
Fast Forward, Pause, and Stop.
R
CLR button
Cancels functions or enters the number 12.
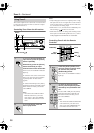
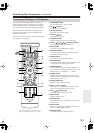
Controlling a VCR or DVR
I
A
R
J
O
N
E
VCR/DVR
G
H
Q
P
L
K
F
B
M
D
C
Press the appropriate Remote
Mode button first
* With some components, certain buttons may not
work as expected, and some may not work at all.