


14
14
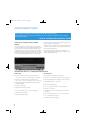
REMOTE CONTROL FUNCTIONS
The AVR 254 remote is capable of controlling 7devices, including the
AVR itself. During the installation process, you may program the codes
for each of your source components into the remote. Each time you
wish to use the codes for any component, first press its Selector button.
This changes the button functions to the appropriate codes.
Each Source Selector has been preprogrammed to control certain types
of components, with only the codes specific to each brand and model
changing, depending on which product code is programmed. The AUX
Source Selector may be used for any of five device types: a CD player,
an HDTV set-top box, a PVD recorder used with cable or satellite televi-
sion, a TiVO
®
set-top box or a VCR. The device mode will depend
on the product code programmed into the AUX Source Selector as
described in the Initial Setup section. CD players use codes beginning
with a 0, 1 or 2; VCRs use codes beginning with a 3 or 4; HDTV
set-top boxes use codes beginning with a 6; PVDs use codes beginning
with a 7 and TiVO set-top boxes use codes beginning with an 8.
The remote automatically switches to the correct device mode, and
it will operate the device as described in the function list in Table A13
in the appendix.
Similarly, the CBL/SAT Source Selector automatically selects cable or
satellite television operation depending on the first digit of the product
code: 0, 1 or 2 for cable and 3 or 4 for satellite boxes.
IMPORTANT NOTE: All of the AVR 254’s audio and video
inputs are independently assignable. As explained in the Initial
Setup section, it is necessary to set up each source, which
includes selecting the inputs to which the device is physically
connected. Any device may be connected to any compatible
input and given any name (e.g. DVD or Game). The Source
Selectors’ device types may be changed. For example, the TV
Source Selector may be reprogrammed to operate a DVD player.
Most of the buttons on the remote have dedicated functions, although the
precise codes transmitted will vary depending on which source device
has been selected for operation. Due to the wide variety of functions
unique to various source devices, we have included only a few of the most-
often used functions on the remote, including alphanumeric keys, transport
controls, television-channel control, menu access and power on and off.
Please refer to the descriptions below for more specific information.
Some buttons are only used to operate the AVR, and their functions are
available at any time, even if the remote has been switched to another
device’s mode: AVR Power On and Off, Audio Effects, Video Modes,
Surround Modes, Volume and Mute. Press the AVR Settings button near
the bottom of the remote to return it to AVR mode.
Any given button may have different functions, depending on which
component is being controlled. Some buttons are labeled with these
functions. For example, the Page Up/Down Buttons are labeled for use
as Channel Up/Down Buttons when controlling a television or cable box.
See Table A13 in the appendix for listings of the different functions for
each type of component.
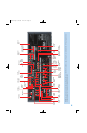
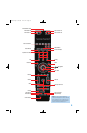
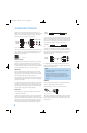
IR Transmitter Lens: As buttons are pressed on the remote,
infrared codes are emitted through this lens. Make sure it is pointing
toward the component being operated.
AVR Power On Button: Press this button to turn on the AVR. The
Master Power Switch on the AVR 254’s front panel must first have been
switched on.
Device Power Off Button: When the remote has been switched to
a device’s mode by pressing its Source Selector, press this button to
turn off the device.
Device Power On Button: When the remote has been switched
to a device’s mode by pressing its Source Selector, press this button to
turn on the device.
Mute Button: Press this button to mute the AVR 254’s speaker and
headphone outputs temporarily. To end the muting, press this button
or adjust the volume. Muting is also canceled when the receiver is
turned off.
AVR Power Off Button: Press this button to turn off the AVR 254.
Source Selectors: Press one of these buttons to select a source
device, which is a component where a playback signal originates, e.g.,
DVD, CD, cable TV, satellite or HDTV tuner. This will also turn on the
receiver and switch the remote’s mode to operate the source device.
The first press of the Radio Selector switches the AVR to the last-used
tuner band (AM, FM or XM). Each successive press changes the band.
Audio Effects: This button is only used to operate the AVR. Press it
to directly access the Audio Effects submenu, which allows adjustment
of the tone and other controls. Each successive press scrolls to the next
line in the menu. See the Initial Setup section for more information.
Video Modes: This button is only used to operate the AVR. Press it
for direct access to the Video Modes submenu, which contains settings
that may be used to improve the picture if necessary after you have
adjusted the picture settings using the video display or TV. Each succes-
sive press scrolls to the next line in the menu. See the Advanced
Functions section for more information.
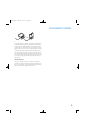
Surround Modes: This button is only used to operate the AVR. Press
it to directly access the Surround Modes submenu. Each successive
press scrolls to the next line in the menu, or use the
⁄
/
¤
Buttons
to scroll to the next line: Auto Select, Virtual Surround, Stereo, Movie,
Music or Video Game. Each menu line represents a type of audio signal,
and is set to the preferred surround mode that you manually select.
Press the OK Button when the menu line is highlighted, and the available
surround mode options for the current signal will appear. Use the
⁄
/
¤
Buttons to select the desired mode, and press the OK Button to engage
it. Press the Back/Exit Button to exit the Surround Modes menu and
display the next higher menu in the hierarchy.
See the Advanced Functions section for more information on surround
modes.
Sleep Settings Button: Press this button to activate the sleep timer,
which turns off the receiver after a programmed period of time of up to
90 minutes. Each successive press increases the timer by 10 minutes,
ending with the “Sleep Off” message.
AVR254om.qxd 3/28/08 12:45 PM Page 14