


GB-25 [ENGLISH]
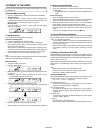
To search a preset station by PTY codes
A particular programme type broadcast can be located by specifying the
PTY codes.
1. Press the RANDOM/RDS button to select “PTY” while listening to an
FM broadcast.
2. Press the PTY “+” or “–” button within 2 seconds to select the desired
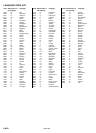
PTY code. The PTY code changes as shown below;
NEWS: News
AFFAIRS: Current affairs
INFO: Information
SPORT: Sport
EDUCATE: Education
DRAMA: Drama
CULTURE: Culture
SCIENCE: Science
VARIED: Varied
POP M: Pop music
ROCK M: Rock music
EASY M: Easy-listening
LIGHT M: Light classics
CLASSICS: Serious classics
OTHER M: Other music
WEATHER: Weather
FINANCE: Finance
CHILDREN: Children’s programmes
SOCIAL: Social affairs
RELIGION: Religion
PHONE IN: Phone in
TRAVEL: Travel
LEISURE: Leisure
JAZZ: Jazz music
COUNTRY: Country music
NATION M: National music
OLDIES: Oldies music
FOLK M: Folk music
DOCUMENT: Documentary
TEST: Alarm Test
ALARM: Alarm
(or in the reverse sequence)
3. Press the PTY CHK button within 10 seconds.
The unit searches 24 preset stations and stops when it finds a
broadcast of the PTY code you have selected, then tunes into that
station.
- To continue searching after the first stop, press the PTY CHK
button within 10 seconds.
- If no broadcast is found, the original station is heard.
To cancel searching, press the n button.
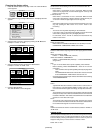
SLEEP TIMER OPERATION
The sleep timer automatically switches off the power after a preset time
has elapsed. The volume will gradually be reduced (fade-out) during the
1-minute period before the unit turns off. There are 4 time periods
available: 30, 60, 90 and 120 minutes.
Press the SLEEP button repeatedly to select the desired sleep time.
“SLEEP” appears and the selected time blinks on the display.
After several seconds, the original display returns and the brightness of
the display reduces.
SLEEP
PL
RSLSSW
RCL
To check the remaining sleep time
Press the SLEEP button once. After several seconds, the original display
returns.
To release the sleep timer while in operation
Press the SLEEP button until “SLEEPOFF” appears. The timer is also
released if the power is switched off.
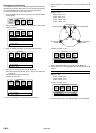
COMBINING THE UNIT WITH ANOTHER
DEVICE
Enjoying analog sounds sent from the TV connected to the EURO AV
CONNECTOR RGB OUT/TV (AUDIO) IN socket
1. Select “TV” by pressing the FUNCTION button.
2. Operate the TV connected to the unit.
Enjoying analog sounds sent from the external device connected to
the VIDEO 1 IN or VIDEO 2 IN sockets
1. Select “VIDEO 1” or “VIDEO 2” by pressing the FUNCTION button.
2. Operate the device connected to the unit.
Enjoying digital sounds sent from the external device connected to
the DIGITAL AUDIO IN socket
1. Select “V1 OPT” or “V2 COAX” by pressing the FUNCTION button.
2. Operate the device connected to the unit.
Changing the digital audio input function mode
It is possible to select a mode for inputting only the digital audio signal
according to the external device connected to the DIGITAL AUDIO IN
socket.
1. Select “V1 OPT” or “V2 COAX” by pressing the FUNCTION button.
2. Press the FUNCTION button on the main unit while pressing the n
button on the main unit.
Each time the button is pressed, the selection changes as shown
below.
V1 OPT
wv
OPTICAL
or
V2 COAX
wv
COAXIAL
Note:
- This mode selection can be made for “V1 OPT” and “V2 COAX”
individually.
- In the case of “V1 OPT” (or “V2 COAX”), both VIDEO 1 IN sockets (or
VIDEO 2 IN sockets) and the DIGITAL AUDIO IN OPTICAL (VIDEO
1) socket (or DIGITAL AUDIO IN COAXIAL (VIDEO 2) socket) are
selected.
- In the case of “OPTICAL” (or “COAXIAL”), only the DIGITAL AUDIO
IN OPTICAL (VIDEO 1) socket (or DIGITAL AUDIO IN COAXIAL
(VIDEO 2) socket) is selected.
- When enjoying video sent from the external device connected to the
VIDEO 1 IN “VIDEO” (or VIDEO 2 IN “VIDEO”) socket, use the VIDEO
OUT or EURO AV CONNECTOR RGB OUT/TV (AUDIO) IN socket.