


Magic 260
17
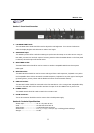
Section 13: AUXILIARY BUTTONS (1-4)
The AUXILIRARY buttons will allow you to switch non DMX fixtures ON/OFF via a universal
DMX pack. This allows you to control up to 4 dance to sound effects and your intelligent lights
from Magic 260. It’s like having two controllers in one. Simply connect the DMX pack to your
DMX link and address it to DMX channel 264. If your pack incorporates dip switches, set dip
switches 1, 3 & 9 to the ON position. The four AUXILIARY buttons will then control pack
channels 1-4. These auxiliary channels are not connected to the rest of the controller.
Therefore, the BLACKOUT function will not affect these four channels. They must be switched
ON/OFF from the relevant AUXILIARY buttons 1-4.
Section 14: HELP Button
The HELP button contains step by step instructions on recording scenes and shows in English and Spanish. These
instructions are read only files that should be used for reference after you’ve read this manual. This manual
contains more detailed information with regards to recording scenes and shows so it is strongly recommended
that you keep this manual for possible use later. When the HELP button is engaged, all functions of Magic 260 are
disabled. Follow the instructions in the display to view the relevant help file. Turn data wheel #4 to navigate
through each step. When you get to the last help step, the HELP LED will turn OFF. Press the MENU button to
exit.
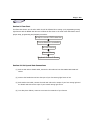
Section 15: Lock/Unlock Memory
Once you’ve programmed all your presets, scenes and shows, you can lock the controller so no unauthorized
personnel change your settings.
(1) From the main screen, press and hold down the “DEL” button then press the “ENTER” button once. Your
display will read as follows:
Select a menu item then press enter.
- Lock/Unlock Memory -
(2) Press the ENTER button to check & change the status if desired.
Memory Status
Unlocked
The current status will be displayed after pressing ENTER. To change the setting turn DATA
wheel #1, then press “ENTER”. The display will momentarily read “DONE” confirming that
status has changed. Repeat steps 1 & 2 to change status as desired.