


Quad Amp Hardware Reference Manual
Installation
2
6
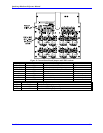
Note:
The Quad Amplifier has a built-in protection against accidentally setting I900 (PWM
frequency) too high, and exceeding the PWM input frequency rating of the power
blocks.
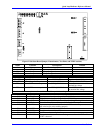
I9n6
For machine interface channel n, I9n6 must be set to 0 to select PWM output format. If i9n6 is set to 1 or 3
while a ‘n’ axis is enabled, Quad Amplifier will disable all enabled axes and the LED display will show
code ‘A’. Also, if i9n6 is set to 1 or 3 and then an ‘n’ axis is enabled, all enabled axes will disable and the
LED display will show ‘A’ as well. I9n6 is a variable specific to an axis, but because of its importance,
Quad Amplifier fault circuits treat it as a global variable. Therefore, if a user assigns an M-variables to
PMAC2 Gate Array registers x:$0710,8,4 through x:$0713,8,4 to monitor Quad Amplifier condition, and
sets i9n6 accidentally to 1 or 3 and then enables ‘n’ axis, all M variables will report a fault code ‘A’.
Note:
The Quad Amplifier has a built-in protection against accidentally setting I9n6
(Output select mode) to DAC mode (I9n6=1 or I9n6=3).
Start-Up Procedures
Before the main power is applied to the Quad Amplifier, check the following:
1. Verify the AC line voltage is corrected for the model of Quad Amplifier being used.
2. Check that motors and encoders are properly wired and grounded.
3. Ensure the PMAC2 I-variables are set as described above.
Power On Sequence
1. Ensure E-Stop Plug (C1) is wired to the normally open auxiliary switch of the Main AC Power
Contactor.
2. Energize the circuit breaker/disconnect to apply power.
3. Energize Main contactor. LED fault indicator should display E at this point. Issue a <o0> from the
terminal window of PEWIN or P2 Setup. LED Fault indicator display should change to C. Allow 1 to 2
seconds for the Quad Amplifier Soft Start circuit to charge the DC bus capacitors.
4. Issuing another <o0> command will enable the appropriate axis and the LED fault indicator will show
0.0 (everything OK, axis enabled). The Quad Amplifier is now ready for use.
5. Set up PMAC2 for digital current loop control of the Quad Amplifier and a motor using the P-2 Setup
program. Save the PMAC2 configuration.
P2Setup
The P2Setup program is essential for making the Quad Amplifier work with PMAC. The user should not
attempt to use the Quad Amplifier without P2Setup.
P2Setup Functions
P2Setup performs the following functions:
• Tests current sensors and ensures they are in proper working condition.
• Tests encoder and ensures proper commutation feedback is available.
• Tunes the current loop to the desired performance parameters.
• Phases the motor for servomotors, magnetization current, and slip gain tuning for induction motors.
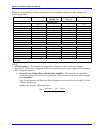
• Calculates PMAC2 current protection parameters for Quad Amplifier and motors (reference Table 4-9).
• Tunes the position and velocity loop.