


38 En
AUTO SETUP
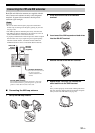
11 Press ENTER to start the setup procedure.
This unit starts the auto setup procedure. Loud test
tones are output from each speaker during the auto
setup procedure. During the setup procedure,
“Measuring...” appears in the GUI screen. We
recommend getting out of the room while thus unit is
in the auto setup procedure. The necessary time for
the auto setup procedure depends on the environment
of the listening room and connected speaker (from 30
seconds to 3 minutes).
y
• To stop the Auto Setup procedure and set this unit to the
pause mode, press one of the cursor buttons (
k / n / l /
h) or ENTER. In the pause mode, press k to retry the
procedure, and
l to cancel the Auto Setup procedure.
• If an error message appears and this unit stops the setup
procedure, see the “Auto Setup” section in
“TROUBLESHOOTING” on page 147, and after carrying
out the remedy, retry the Auto Setup procedure.
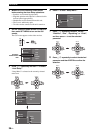
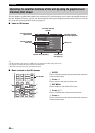
12 Once all items are set successfully, following
display appears in the GUI screen.
• Press n and select “Setup” to set the measured
values.
• Press k and select “Retry” to retry the Auto Setup
procedure.
• Press h and select “Detail” to view information
about measurement results and warning messages.
For more details about warning messages, see the
“Auto Setup” section in “TROUBLESHOOTING”
on page 147.
• Press l and select “Exit” to exit from the Auto
Setup procedure. If you select “Exit”, “Don’t
Setup?” appears on the screen. To set the measured
values and exit, select “Yes”. To cancel the settings
and exit, select “No”.
y
If you are not satisfied with the results or want to manually
adjust each parameter, set the parameters in “Basic” (see
page 104).
• If you change speakers, speaker positions, or the layout of
your listening environment, run “Auto Setup” again to
recalibrate your system.
• The distances displayed in the “Distance” results may be
longer than the actual distance depending on the
characteristics of your subwoofer.
• In the “Equalizing” results, different values may be set for
the same band to provide finer adjustments.
13 Press SET MENU to exit from the GUI screen.
• After you have completed the “Auto Setup” procedure, be
sure to disconnect the optimizer microphone.
• The optimizer microphone is sensitive to heat. Keep it
away from direct sunlight and do not place it on top of this
unit.
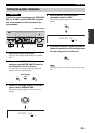
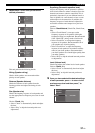
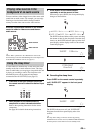
■ Reviewing the result of the auto setup
Use this feature to review the result of the auto setup.
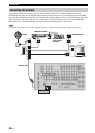
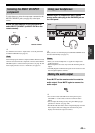
1 Set the operation mode selector to AMP and
then press SET MENU to turn on the GUI
screen.
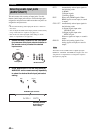
A/B/C/D/E
PRESET/CH
ENTER
Measurement Over
Successfully
Result
Level
Equalizing
Retry
Setup
Exit Detail
Notes
Notes
MENU
SRCH MODE
SET MENU
MENU
SRCH MODE
SET MENU
Sound
Video
Option
Basic
NET/USB
Manual Setup
Auto Setup
System Memory
Input Select
Stereo/Surround
TV
SOURCE
AMP