


59
GB
Optional Components
(Other models)
To listen to the sound of the
connected MD deck:
Press MD (VIDEO) (or FUNCTION on the
remote repeatedly until “MD (VIDEO)”
appears).
Start playing the connected component.
To listen to the sound of the
connected VCR:
Hold down MD (VIDEO) and press ?/1
while the power is on. Release ?/1 first,
then release MD (VIDEO). This switches
the function from MD to VIDEO. Once you
switched to the VIDEO function, just press
MD (VIDEO).
Start playing the connected component.
Note
If the sound is distorted or too loud when VIDEO
function is selected, or you want to switch back to
MD function, repeat the operation described above to
switch to MD function.
Recording audio from a
connected component
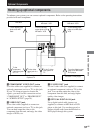
1 Connect the audio cords.
See “Hooking up optional components” on
page 57.
2 Start recording manually.
See “Recording to a tape” on page 45.
Recording on a connected
component
1 Connect the audio cords for analog
recording, or connect the digital optical
cable for digital recording.
2 Press EFFECT repeatedly to select
“EFFECT OFF”.
3 Press 2.1CH/MULTI on the remote
repeatedly to select “2.1CH”.
4 Start recording.
Refer to the operating instructions provided
with connected component.
Notes
• Digital signals are output from OPTICAL DVD
DIGITAL OUT jack during DVD function only.
Besides, the sound output from the OPTICAL DVD
DIGITAL OUT jack is not affected by the sound
adjustment. Digital signals from Super Audio CDs
are not output from OPTICAL DVD DIGITAL
OUT (DHC-FL7D only).
• This unit is not compatible with 96 kHz sampling
frequencies and Super Audio CD format.
• While recording, do not change the 2.1CH/MULTI
setting.