


35
Recording
Chapter 3 Recording and Playback
Recording
This section describes video and audio recording on the
unit.
See page 65 “Function Menu” in Chapter 6 for more
information about function menu operations.
See page 71 “Setup Menu Operations” in Chapter 6 for
more information about setup menu operations.
It is not possible to combine material recorded in different
system frequencies and audio recording formats on a
single disc (although different bit rates may be combined).
If you attempt to record material in a system frequency or
audio recording format that differs from that of existing
recorded material on the disc, “REC INH” appears on the
display and recording is inhibited.
Make the following settings and adjustments before
starting to record.
Recording format settings: See the next section “To set
the video and audio recording formats”.
Video input signal selection: Select with V INPUT on the
HOME page of the function menu.
Audio input signal selection: Select with A1 INPUT to
A4 INPUT on the HOME page of the function menu.
Remote/local setting: Set the remote control switch. If
you set it to REMOTE, also set the setup menu item
INTERFACE SELECT >REMOTE I/F (“REMOTE”
and the connector used appear on the display).
To set the video and audio recording
formats
To set the video recording format
Set the video bit rate (compression method) by setting
OPERATIONAL FUNCTION >REC FORMAT in the
setup menu to one of the following.
To set the audio recording format
Set AUDIO CONTROL >REC MODE in the setup menu
to one of the following.
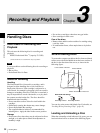
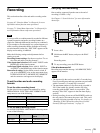
Carrying Out Recording
One recording segment (from the start to the end of
recording) is called a “clip”.
See Chapter 4 “Scene Selection” for more information
about clips.
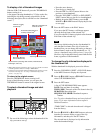
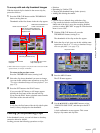
1
Insert a disc.
2
Hold down the REC button, and press the PLAY
button.
Recording starts.
3
To stop recording, press the STOP button.
If the disc becomes full
Recording stops and the message “ALARM DISC END.”
appears on the monitor.
• The shortest clip that can be recorded is 2 seconds long.
Even if recording start and stop operations are performed
within 2 seconds, a 2-second clip is recorded.
• The maximum number of clips that can be recorded is
300. If the loaded disc already contains 300 clips,
recording with the REC button is not possible. (The
message “Disc Full!” appears in the time data display
section.)
• During recording, do not turn off the POWER switch on
the rear panel or disconnect the power cord. This could
cause the clip being recorded to be lost. For details, see
“Handling of Discs When Recording Does Not End
Normally (Salvage Functions)” on page 33.
Note
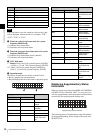
Menu setting/display Video bit rate
HQ VBR 35 Mbps
SP CBR 25 Mbps
LP VBR 18 Mbps
Menu setting Display Audio recording
format
2ch×16bit 2CH 16BIT 2 channels/16 bits
4ch×16bit 4CH 16BIT 4 channels/16 bits
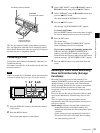
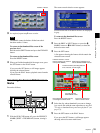
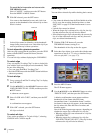
Notes
PHONES
VAR
JOG
MARK1
MENU
PAGEDISPLAY
SUB
CLIP
F1
F5
F4
F3
F2
SHIFT
CLIP
MENU
ESSENCE
MARK
SET
THUMB
NAIL
RESET
OUTIN
MARK2
SHUTTLE
TOP
KEY INHI
EXPAND
CHAPTER
F REV F FWD
END
PREV NEXTPLAY STOP
STANDBY
REC
EJECT
CH 1 CH 2 CH 3 CH 4
NETWORK
LOCAL
REMOTE
ACCESS
LEVEL
REC
VARIABLE
PRESET
PB
23
1