


23
Removing the Connector Covers
Chapter 2 Preparations
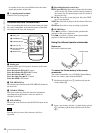
Be sure to carry out step 3 before powering the unit
off. The new system frequency setting will not be
saved if you power off without carrying out step 3.
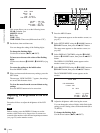
4
Press the on/standby switch to put the unit into
standby, and then press it again to power the unit on.
The selected system frequency becomes available for
use.
You can change the system frequency setting by using the
setup menu item OPERATIONAL FUNCTION >SYSTEM
SEL >SYSTEM FREQ.
For details about the setup menu, see page 67 “System
Menu” in Chapter 6.
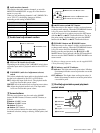
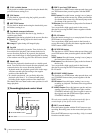
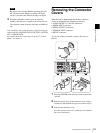
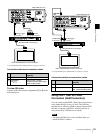
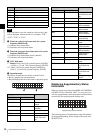
Removing the Connector
Covers
When the unit is shipped from the factory, connector
covers are attached to the following connectors.
• AUDIO OUTPUT 1/3 and 2/4 connectors
• HDSDI INPUT connector
• HDSDI OUTPUT connectors
• SDSDI OUTPUT connector
• RS232C connector
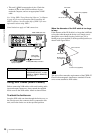
To use one of these connectors, remove the cover as
follows.
1
Press the POWER (main power) switch to power the
unit off.
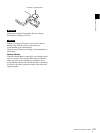
2
Remove the screw(s) of the connector cover, using a
screwdriver that matches the grooves of the screw(s).
3
Remove the connector cover.
Save the screw(s) and cover, so that you can reattach
the cover if necessary.
Note
SDSDI OUTPUTHDSDI INPUT
AUDIO INPUT
HDSDI OUTPUT
12
REF VIDEO INPUT
TIME CODE
POWER
ANALOG HD INPUT
DIGITAL
AUDIO
(AES/EBU)
COMPOSITE OUT AUDIO MONITOR
1/3 2/4
AUDIO OUTPUT
1/3 2/4
R L IN OUT
Y/G P
B /R
SYNS
RS232C REMOTE(9P)
PB /B
1/2
INPUT
OUTPUT
CONTROL
3/4
1/2 3/4
S400
-AC IN
MONITOR
2
1
2
3
3
2
3