


63
5 Turn the jog dial to select the
destination point on the disc, and then
press to enter.
On the remote control
1 Press DISPLAY for 2 seconds or more.
2 Turn the control repeatedly until “GROUP”
flashes in the display, and then press
x to
enter.
3 Turn the control repeatedly until “GROUP
ON” appears in the display and then press
x
to turn group mode on.
4 While playing a track within a group whose
order you want to change, press DISPLAY
for 2 seconds or more.
5 Turn the control repeatedly until “EDIT”
flashes in the display, and then press
x to
enter.
6 Turn the control repeatedly until “GP:Move”
flashes in the display and then press
x to
enter.
7 Turn the control repeatedly to select a
destination point on the disc, and then press
x to enter.
To cancel moving
• On the recorder
Press CANCEL in step 5.
• On the remote control
Press DISPLAY for 2 seconds or more.
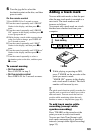
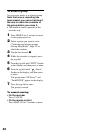
Adding a track mark
You can add track marks so that the part
after the new track mark is counted as a
new track. The track numbers will
increase as follows.
You cannot add a track mark on a track
that has been checked-out from your
computer.
1 While playing or pausing an MD,
press T MARK on the recorder at the
point you want to mark.
“MARK ON” appears in the display,
and a track mark is added. The track
number will increase by one.
z
The quick search function quickly searches for
specific track or position at which you wish to
add track mark. You can search the track or
position while monitoring either the track
number or name, or elapsed time (page 40).
To add track marks while
recording (except while
synchro-recording)
Press T MARK on the recorder at the
point you want to add a track mark.
You can use Auto Time Stamp to add
track marks automatically at specified
intervals (except while digital recording)
(page 35).
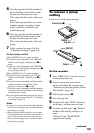
1 3 42
231 4 5
Track marking
Track numbers increase
T MARK