8 9
English
RA‑1520 Stereo Integrated Amplifier
8 9
English
RA‑1520 Stereo Integrated Amplifier
To program for the RT-940AX: press the POWER button and
the 2 button simultaneously.
To program for the RT-1080/RT-1082/RT-1084: press the
POWER button and the 1 button simultaneously.
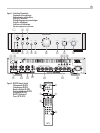
Remote Sensor 3
The remote sensor receives infrared signals from the remote control.
Do not cover or block the sensor. It must be unobstructed or the remote
control will not work properly.
The operation of the remote sensor can also be affected if it is exposed
to bright sunlight or certain types of lighting (such as halogen lights) that
emit infrared light. In addition remote control functions may not work
reliably if the batteries in the RR-AT94 are weak.
Note: To use the remote, aim it at the remote sensor on the front
panel of the RA-1520.
Remote Control Batteries
Two UM-4/AAA size batteries (supplied) must be installed before the
remote control can be used. To install the batteries, remove the cover on
the back of the RR-AT94. Install the batteries as shown in the illustration
in the battery well. Test the control for proper operation, then replace the
cover. When the batteries become weak the remote control won’t operate
the RA-1520 consistently. Installing fresh batteries should eliminate the
problem.
EXT REM IN Jack r
The 3.5 mm mini-jack labeled EXT REM IN can receive command codes
from a third-party infrared receiver or Rotel remote zone keypad. It
can be used with an outboard IR receiver to duplicate the front panel
IR sensor. This feature is useful when the IR signals from a hand-held
remote control cannot reach the front panel IR sensor, for example if unit
is installed in a cabinet and the front panel sensor is blocked, or when IR
signals need to be relayed to other components.
Consult your authorized Rotel dealer for information on external
receivers and proper wiring of 3.5mm mini-plugs to fit the REM IN jack.
Note: The IR signals from the EXT IN jack can be relayed to
source components using external IR emitters or hard-wired
connections from the IR OUT jacks. See the following section for
additional information.
IR OUT Connection t
The 3.5mm IR OUT jack sends IR signals received at the EXT REM IN jack
to an infrared blaster or emitter placed in front of a source component’s
IR sensor. In addition, the IR OUT connection can be hard-wired to Rotel
CD players, DVD players, or tuners with a compatible connector.
For example, this allows the RA-1520 to pass along IR signals when
the sensors on the source components are blocked by installation in a
cabinet.
See your authorized Rotel dealer for information on IR emitters and
repeater systems.
Note: Remove the batteries from the remote if it will not be used
for a long period of time. Do not leave run down batteries in
the remote control; they can leak corrosive chemicals which will
damage the unit.
Speaker Outputs
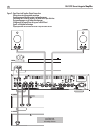
See Figure 3
The RA-1520 has two sets of speaker outputs, labeled SPEAKER A and
SPEAKER B. The speaker outputs are controlled by the switch on the front
panel.
Speaker Impedance
If only one set of speakers will be used at any given time, the speakers
may have an impedance as low as 4 ohms. If there are times when
both the A and B speakers will be used, all the speakers should have an
impedance of 8 ohms or more. Speaker impedance ratings are less than
precise. In practice, very few loudspeakers will present any problems
for the RA-1520. See your authorized Rotel dealer if you have any
questions.
Speaker Wire
Use insulated two-conductor stranded wire to connect the RA-1520 to
the speakers. The size and quality of the wire can have an audible effect
on the performance of the system. Standard speaker wire will work,
but can result in lower output or diminished bass response, particularly
over longer distances. In general, heavier wire will improve the sound.
For best performance, you may want to consider special high-quality
speaker cables.Your authorized Rotel dealer can help in the selection of
cables for your system.
Polarity and Phasing
The polarity – the positive/negative orientation of the connections – for
every speaker and amplifier connection must be consistent so all the
speakers will be in phase. If the polarity of one connection is reversed,
bass output will be very weak and stereo imaging degraded. All wire
is marked so you can identify the two conductors. There may be ribs
or a stripe on the insulation of one conductor. The wire may have clear
insulation with different color conductors (copper and silver). There may
be polarity indications printed on the insulation. Identify the positive and
negative conductors and be consistent with every speaker and amplifier
connection.
Speaker Connections []
Turn off all the components in the system before connecting the speakers.
The RA-1520 has color-coded speaker connectors on the back panel.
These connectors accept bare wire, or connector lugs. (In non-EC
markets, the connectors also accept dual banana plugs.)
Route the wire from the RA-1520 to the speakers. Give yourself enough
slack so you can move the components to allow access to the speaker
connectors. If you are using dual banana plugs, connect them to the
wires and then plug into the backs of the binding posts. The thumbscrews
of the binding posts should be screwed in all the way (clockwise).
If you are using terminal lugs, connect them to the wires. If you are
attaching bare wires directly to the binding posts, separate the wire
conductors and strip the insulation from the end of each conductor. Be
careful not to cut into the wire strands. Unscrew (turn counterclockwise)
the binding post thumbscrews. Place the connector lug or wire around
the binding post shaft. Turn the thumbscrews clockwise to clamp the
connector lug or wire firmly in place.
Note: Be sure there are no loose wire strands that could touch
adjacent wires or connectors.


