10 11
English
RA‑1520 Stereo Integrated Amplifier
10 11
English
RA‑1520 Stereo Integrated Amplifier
Audio Controls
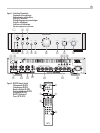
The following controls are used to operate the RA-1520.
VOLUME Control 0C
Turn the front panel VOLUME control clockwise to increase the volume,
or counterclockwise to decrease the volume. Alternatively, press the VOL
buttons on the remote control to adjust the volume up or down.
BALANCE Control -
The Balance Control adjusts the left-to-right balance of the sound
output. Normally the control should be left in the center position.
In some situations, typically when the main listening position is not
ideally centered between the speakers, it may be necessary to adjust
the control to achieve proper left-to-right balance. Turning the control
counter-clockwise shifts the sound balance to the left. Turning the control
clockwise shifts the sound balance to the right.
BASS and TREBLE Tone Controls 79
These two front panel rotary controls are used to make adjustments to the
tone or contour settings, boosting or cutting high frequencies (TREBLE)
and low frequencies (BASS). If tone adjustments are not required, the
tone control circuit can be bypassed by using the TONE On/Off switch.
TONE On/Off 8
When this button is in the ‘off’ position (with the button out) the BASS
and TREBLE tone controls are inoperative. This setting gives a more direct
signal path and may give a small improvement in sound quality for
critical listening.
LISTENING Selector qB
The setting of the LISTENING selector controls which of the input signals
goes to the main outputs and onto the power amplifier – or, more simply,
which source is heard. Turn the front panel control to the source you
want to hear, or press the corresponding button on the RR-AT94 remote.
RECORDING Selector =
The RA-1520 can record from any input source (except TAPE 2) to a
recorder connected to TAPE 1 or TAPE 2 outputs. To select an input
source for recording, turn the RECORDING control on the front-panel to
the desired source.
This selection is independent of the source selected for listening. While
recording, you may still select a different source using the LISTENING
selector.
If you have a three-head recorder or a DAT recorder that allows
simultaneous read and write operation, you can monitor your recording
by setting the LISTENING switch to the TAPE 1 or TAPE 2 position.
Note: If you select TAPE 1 with the RECORDING control, the
recording signal will only be available at the TAPE 2 recording
outputs, not the TAPE 1 outputs. To dub a tape, select TAPE 1 and
record to the tape deck connected to the TAPE 2 outputs.
MUTE Button A
To temporarily mute the sound of the system press the MUTE button on
the RR-AT94 remote. Press the button again to return the sound volume to
the original level. The LED in the volume control will flash when the unit
is muted.
PHONES Output 5
The PHONES output allows you to connect headphones for private
listening. This output accepts standard stereo 1/8” stereo mini plugs.
If your headphones have a 1/4” plug, you will need an adapter plug.
Contact your authorized Rotel dealer, to get the correct adapter plug.
Note: Plugging in headphones does not cut off the signal to the
speakers. If desired, use the SPEAKERS selector to turn off the
signal to the speakers for private listening.
SPEAKERS Selector 6
A four-position rotary switch on the front panel determines which set of
speakers, if any, is active. Set the SPEAKER selector as follows:
OFF: No speakers will be heard. Use this position when listening to
headphones.
A: The speakers connected to the SPEAKER A terminals will be heard.
B: The speakers connected to the SPEAKER B terminals will be heard.
A+B: The speakers connected to both the SPEAKER A and SPEAKER B
terminals will be heard.
Protection Circuit
Protection Indicator 2
Thermal protection circuits protect the amplifier against potential damage
in the event of extreme or faulty operating conditions. Unlike many
designs, the RA-1520 protection circuit is independent of the audio
signal and has no impact on sonic performance. Instead, the protection
circuit monitors the temperature of the output devices and shuts down the
amplifier if safe limits are exceeded.
In addition, the RA-1520 includes over-current protection which operates
only when load impedances drop too low. This protection is independent
for each channel and is indicated by the front panel Protection LED.
Should a faulty condition arise, the amplifier will stop playing and the
Protection LED on the front panel will light.
If this happens, turn the amplifier off, let it cool down for several minutes,
and attempt to identify and correct the problem. When you turn the
amplifier back on, the protection circuit will automatically reset and the
PROTECTION LED should go out.
In most cases, the protection circuitry activates because of a fault
condition such as shorted speaker wires, or inadequate ventilation
leading to an overheating condition. In very rare cases, highly reactive
or extremely low impedance speaker loads could cause the protection
circuit to engage.


