


14
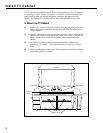
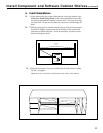
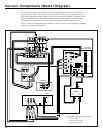
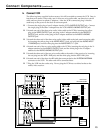
Connect Components
(continued)
L
R
AUDIO OUT
1/L
1
2
2/R
1
2
S-VIDEO
OUT
VIDEO OUT
VCR 1 VCR 2/LD DSS MONITOR
OUT
VCR 1 DSSVCR 2/LD
IN
OUT IN OUT
IN OUT IN OUT
IN OUT IN OUT
TV CD TAPE 1/DAT TAPE 2/MONITOR
VIDEO
AUDIO
R
L
AUDIO
R/
MONO
SELECT OUTHI-FI OUT
R/
MONO
INPUT 1
R/
MONO
INPUT 2
L
L
L
S-VIDEO
VIDEO
INPUT SELECT
OUT21
CONVERTER
ANT B
ANT A
CABLE/ANTENNA
L
R
+
–
–
+
FRONT
L
R
+
–
–
+
SURROUND
IN FROM
ANT
OR
CABLE
CENTER
+
–
LaserDisc Player
Jack Panel
Extension Cable
A/V Receiver
L
R
L
SUB WOOFER
OUT
SUBWOOFER
OUT
R
L
L
R
L
V
R
IN FROM
DSS ANT
AUDIO
V
L
R
L
➤
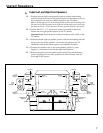
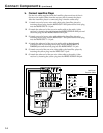
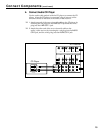
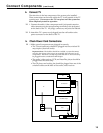
Connect LaserDisc Player
Use the two cables supplied with the LaserDisc player and one of the six
foot two wire audio cables from the accessory kit to connect the player.
After the LaserDisc player is connected, plug it into the outlet strip.
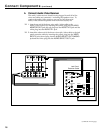
❑ 1.Attach one end of a two-wire audio cable to the LaserDisc player by
inserting the red plug into the AUDIO OUT 2 2/R jack and the white plug
into the AUDIO OUT 2 1/L jack.
❑ 2.Attach the other end of the two-wire audio cable to the audio/video
receiver by inserting the red plug into the AUDIO VCR2/LD IN R jack and
the white plug into the AUDIO VCR2/LD IN L jack .
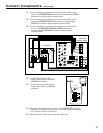
❑ 3.Attach one end of a two-wire audio cable to the LaserDisc player by
inserting the red plug into the AUDIO OUT 1 2/R jack and the white plug
into the AUDIO OUT 1 1/L jack.
❑ 4.Attach the other end of the two-wire audio cable to the jack panel
extension cable by inserting the red plug into the AUDIO INPUT 2
R/MONO jack and the white plug into the AUDIO INPUT 2 L jack.
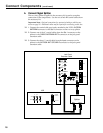
❑ 5.Attach one end of the one-wire video cable to the LaserDisc player by
inserting the yellow plug into the VIDEO OUT 1 jack.
❑ 6.Attach the other end of the one-wire video cable to the audio/video
receiver by inserting the yellow plug into the VIDEO VCR2/LD IN jack.