


Section 1: Introduction- Quick Start
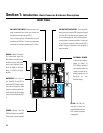
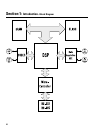
3 CONNECT THE AUDIO INPUTS
If your using.......
the CHANNEL 1 INPUT & CHANNEL 2 INPUT connectors
the DataPort input (QSC CM16a or related products)
Then you need to......
connect your input signal source to terminal block connectors
(refer to page 18) and plug the connectors into the CHAN-
NEL 1 INPUT and CHANNEL 2 INPUT receptacles.
connect the DataPort output from the CM16a (or other
related DataPort product) to the DataPort input of the DSP-
3. Use a QSC DataPort cable (male-to-male) for this connec-
tion. Refer to page 19.
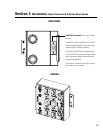
4 TURN THE AMP GAIN DOWN, POWER UP THE AMPLIFIER & THE DSP-3
If the DSP-3 requires power from the accessory external power supply, apply
power to the DSP-3 FIRST, then turn on the amplifier. The power supply must be
plugged into an operational AC power receptacle. Then plug the “barrel” connector
(coaxial power plug) fully into the EXTERNAL POWER receptacle on the DSP-3. When
power is properly applied to the DSP-3, the blue POWER LED will be illuminated. Use
a plastic wire-tie (tie-wrap) to secure the accessory power supply’s cord to the DSP-3’s
chassis; there is a metal tab on the chassis for this purpose.
If the DSP-3 is powered by the amplifier’s DataPort, the amplifier must be
connected to an operational AC power receptacle. Then turn the amplifier “on” using
its power switch. The blue POWER LED on the DSP-3 will illuminate a few seconds
after the amplifier’s power switch is activated. If the DSP-3’s blue POWER LED does
not illuminate, you may have an older QSC DataPort equipped amplifier that requires
use of the accessory external power supply (refer to the Appendix for complete
application information).
8