


6 ESTABLISH COMMUNICATION BETWEEN THE DSP-3 & THE COMPUTER
Section 1: Introduction- Quick Start
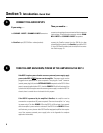
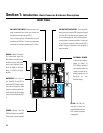
At this point, you should have everything “up and running”. In the Signal Manager application, check the
COMMUNICATION STATUS PANE
(lower right corner of the Signal Manager window, see above).
If the
COMMUNICATION STATUS PANE
indicates.....
ONLINE
OFFLINE
Then you need to......
Do nothing! Your communication settings match the COM port
you connected the DSP-3 to.
Select
Tools
from the Menu Bar, select
Options
; the
Options
dialog box will open. Click on the
DSP
tab. In the
Serial Port
Selection
field, click on the “down arrow” next to the port
selection data window. A drop down list of COM1 through COM4
will appear. Select the COM port number that corresponds to the
COM port of your computer that the DSP-3 is connected to. Click
OK
(at the bottom of the dialog box); the dialog will close. Exit
Signal Manager and restart it so that the newly selected
COM port will become active. The Communication Status
pane should now indicate ONLINE if everything was connected
and set up properly.
7 ENSURE THE AMPLIFIER IS TURNED DOWN AND THAT YOU HAVE SUITABLE
SPEAKERS CONNECTED FOR YOUR INTENDED CONFIGURATION
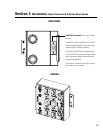
For familiarization with the DSP-3 and the Signal Manager software, we recommend that you use a pair of full range
speakers connected to your amplifier and that the amplifier gain be reduced to the minimum useful setting. This will
allow you to configure the DSP-3 almost anyway you desire while providing audio output to verify that the DSP-3 is
doing as you intend. Small, high-power rated monitor speakers are perfect for the task.
Better safe than sorry! Don’t turn you amp all the way up; if communica-
tions between the computer and DSP-3 fail for any reason, unexpected
output transients could damage your speakers
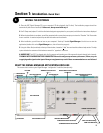
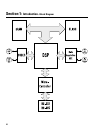
8 CREATE A SIMPLE DSP CONFIGURATION
10
n From the Menu Bar, select
Configuration
,
New
. If there was a default configuration on the Workspace, you will be prompted to close
the “current” configuration first.
n Locate the Inputs and Outputs palette; left-click on the icon labeled IN1. Move your pointer into the upper left area of the Workspace
and left-click the mouse again. The IN1 object should now be on your workspace.