


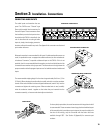
CONNECTION TO 10BASE-T (network connection)
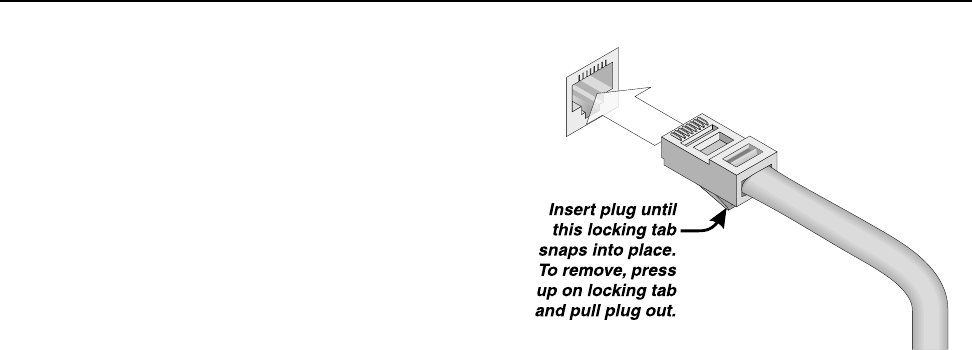
Connection to the Ethernet network is made using the RJ-45 type
connector labeled 10BASE-T on the rear panel. The RJ-45 is the standard
network connector for Ethernet networks. Insert the RJ-45 plug into the
receptacle with the lock-tab oriented toward the bottom of the CM16a
and push firmly until the connector locks into place (usually an audible
“click” can be heard). Refer to Section 1 of this manual for Ethernet
connection schemes and cabling. Keep in mind that if the CM16a is
connected
directly
to the system controller computer’s network interface
card, a
crossover
type cable is required. All other connection methods
utilize normal Ethernet cabling.
CONNECTING TO THE RS-232 PORT
The RS-232 port can be used for setting various operational parameters that are CRITICAL to proper operation of the CM16a. The network
address settings can be changed through this port BUT SHOULD NOT BE CHANGED UNLESS YOU KNOW FOR CERTAIN WHAT YOU ARE
DOING! Connection is made with a null-modem serial cable with a DB-9 male plug to the CM16a. Refer to Section 3 for more information.
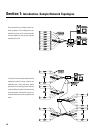
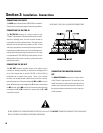
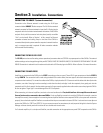
CONNECTING TO AMPLIFIERS
Amplifiers are connected to the CM16a via the PORT connections on the rear panel. These HD-15 type connectors are labeled PORT A
through PORT H. The connection itself is made using standard VGA monitor cables (the same type of cable that interconnects personal
computers to their monitors). To connect the cables to the CM16a, simply orient the HD-15 connector with its wider-side down (look at the
connector, one side of the plug’s metal surrounding is wider than the other) and align it with the receptacle, then gently push into the
receptacle until it is firmly seated. Use the retaining screws (or finger-screws) supplied on the cable ends to secure the plug to the CM16a.
Be sure to tighten “finger tight” to avoid damage to the HD-15 receptacle.
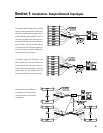
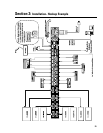
When connecting to 4-channel amplifiers, two basic rules must be adhered to.
First
, both DataPorts of the amplifier must be used.
Second
, both must be connected to the same CM16a. If only one DataPort connection is used, the CM16a will not control or monitor
the amplifier correctly ( the same applies for connecting the two amplifier DataPorts to two separate CM16a’s; the system will not function
properly). Insure that both amplifier DataPorts are used and that they are connected to the same CM16a. You do not have to use adjacent
ports on the CM16a (i.e. PORT C and PORT D). You can use any two ports for convenience; the only impact of doing this is that the System
Manager software control panel will not show all four channels next to each other.
For 2-channel amplifiers, it is a simple one DataPort, one cable connection to the appropriate rear panel PORT receptacle on the CM16a.
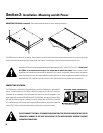
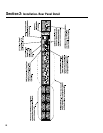
Section 2: Installation- Connections
21