


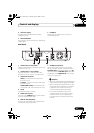
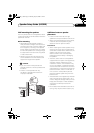

Controls and displays 01
15
En
English
FrançaisDeutsch
Nederlands
Italiano Español
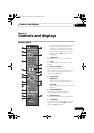
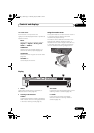
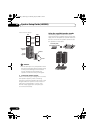
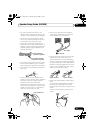
4 Character display
Displays the title/chapter/track number,
elapsed time, etc.
5 24HZ/50HZ/60HZ
The frequency of the video frame or field being
output lights.
6
CONTROL
Lights when the HDMI Control function is
activated (page 78).
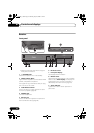
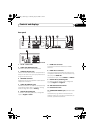
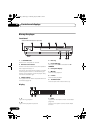
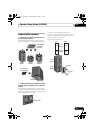
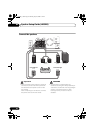
Rear Panel
1
AUDIO OUT (2 ch)
terminals
Connect with the audio input terminals on a TV
or tape recorder, etc.
2
AUDIO OUT (7.1 ch)
terminals
Connect with the 7.1 channel audio input
terminals on an AV receiver or amplifier, etc.
3
VIDEO OUT
terminals
VIDEO – Connect with the video input
terminal on a TV.
S-VIDEO – Connect with the S-Video input
terminal on a TV.
COMPONENT VIDEO – Connect with the
component video input terminals on a TV.
4
AC IN
Connect the power cord here.
5
HDMI OUT
terminal
Connect to the HDMI IN 1 jack of the receiver
with the supplied HDMI cable.
6
DIGITAL OUT
(
OPTICAL
)
Connect with the digital audio input terminal
on the other audio component.
7
CONTROL IN
terminal
Use to control this player from the remote
sensor of another Pioneer component with a
CONTROL OUT terminal and bearing the
mark. Connect the CONTROL OUT of the other
component to the CONTROL IN of this player
using a mini-plug cord.
Caution
• Be sure to connect cables for outputting the
audio and video signals (pages 76 and 80).
• When connected via System Control, point
the remote control toward the connected
component. The remote will not work
correctly when pointed at this player.
• You cannot use System Control with
components that do not have a System
Control terminal or with components
manufactured by companies other than
Pioneer.
R
R
AUDIO OUT ( 2 ch ) AUDIO OUT ( 7.1 ch )
VIDEO OUT
HDMI OUT
DIGITAL
OUT
CONTROL
IN
L
L
Y
P
B
PR
FRONT
OPTICAL
COMPONENT
VIDEO
SURROUND
CENTER
VIDEO
S-VIDEO
SUB WOOFER
SURROUND BACK
AC IN
21 3 4
6 57
LX03BD_1.book Page 15 Monday, July 28, 2008 2:12 PM