


8
Initial configurations
Getting started
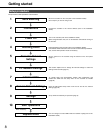
The procedure to start operations is shown below.
Setup procedure
1 Rack Mounting
Mount the recorder into the rack (refer to the Installation Guide).
Go to step 2 if you are not using a rack.
2 Connections
Connect the recorder to the various devices (refer to the Installation
Guide).
3 Power On
Turn on the recorder (refer to the Installation Guide).
When using extension units, turn on all extension units before turning on
the recorder.
4 Installing HDDs
Install the HDDs in the recorder (refer to the Installation Guide).
Unformatted HDDs inserted into the recorder are automatically initialized.
Also, set the HDD operation mode as necessary.
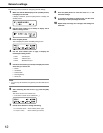
5 Recorder Network
Settings
Set the network for the recorder using the buttons on the front panel
(page 11).
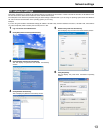
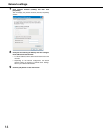
6 PC Network Settings
This section explains how to change PC network settings to match the
settings of the recorder (page 13).
7 Initialize HDDs
To change HDD area management, display disk configuration and
initialize the HDD from the setup menu on the recorder as needed
(page 86).
8 Camera Network Settings
Open the NW camera setup menu from the PC and do the network
settings (page 48).
9 Settings
Set up functions necessary for operation (page 9).
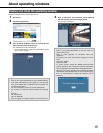
10 Start Operations
When necessary
Replace HDDs
You can change or format HDDs while the recorder is [ON] (refer to the
Installation Guide).