


40
RQT9223
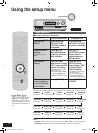
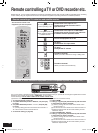
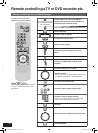
Using the setup menu
Reducing standby power
consumption (power save mode)
1. To enter the SETUP (
➔
pa
ge 36)
2. Press [
e
][
r
] to select
“HDMI ”, and press
[OK] to confirm.
3.
Press [
e
][
r
] to select
“STNBY ”, and
press [OK] to confirm.
4.
Press [
e
][
r
] to select
“OFF ”, and press
[OK] to confirm.
OFF : When you wish to reduce standby power
consumption
ON :
When you activate the standby through function
(
➔
page 13)
(standby power consumption becomes 0.8
W in this setting)
When you select “OFF ”, the followings become applicable.
• Standby power consumption becomes 0.4 W.
– Standby through with HDMI connections does not work.
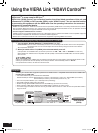
• VIERA Link (
➔
pages 32 and 33) is cancelled when the
unit is off
.
Factory setting: ON
5. To finish the setting (
➔
pa
ge 36)
Setting VIERA Link to “OFF”
1. To enter the SETUP (
➔
pa
ge 36)
2. Press [
e
][
r
] to select
“HDMI ”, and press
[OK] to confirm.
3.
Press [
e
][
r
] to select
“CTRL ”, and press
[OK] to confirm.
4.
Press [
e
][
r
] to select
“OFF ”, and press
[OK] to confirm.
OFF : When you do not use VIERA Link function
ON : When you use VIERA Link function
Factory setting: ON
5. To finish the setting (
➔
pa
ge 36)
Switching the attenuator
Switch the attenuator “ON ” when sounds become distorted
while playing an analog input source.
1. To enter the SETUP (
➔
pa
ge 36)
2. Press [
e
][
r
] to select
“ATTENUATOR ”,
and press [OK] to confirm.
3. Press [
e
][
r
] to select
“ON ”, and press
[OK] to confirm.
OFF : For switching the attenuator off
ON : For switching the attenuator on
F
actory setting: OFF
4. To finish the setting (
➔
pa
ge 36)
Adjusting the time lag by delaying
audio output when pictures on TV
arrives after sounds
1. To enter the SETUP (
➔
pa
ge 36)
2. Press [
e
]
[
r
] to select “SOUND DLY ”, and
press [OK] to confirm.
3. Press [
e
][
r
] to select the setting,
and
press [OK] to confirm.
AUTO, OFF, 10, 20, 30, 40, 60, 80, 100, 120, 140, 160, 180,
200 (msec)
Factory setting: AUTO
Note
• “AUTO ” can only be effective when connecting the unit
to an HDAVI Control 3 compatible Panasonic TV (VIERA)
(
➔
page 32).
•
When connecting the unit to a Panasonic TV (VIERA), which
does not incorporate HDAVI Control 3, or other company’s
TV, “AUTO ” setting automatically becomes “40 ” (msec).
4. To finish the setting (
➔
pa
ge 36)
Changing the volume display
You can change the volume display from dB value to numeric
value.
1. To enter the SETUP (
➔
pa
ge 36)
2. Press [
e
][
r
] to select
“VOL MODE ”, and
press [OK] to confirm.
3. Press [
e
][
r
] to select the displa
y, and
press [OK] to confirm.
Numeric value display: This mode displays the sound
volume value in number from 0 to
50. (Factory setting: 16 )
dB value display: This mode displays the sound volume
value in dB value. (Factory setting: –
48dB )
Factory setting: dB value display
4. To finish the setting (
➔
pa
ge 36)
• When you change the volume display, the sound volume
returns to the factory setting.
Reset (factory settings)
The operation settings for the unit will be initialised to the
settings made at the time of shipment.
1. To enter the SETUP (
➔
pa
ge 36)
2. Press [
e
][
r
] to select
“RESET ”, and
press [OK] to confirm.
3.
Press [
e
][
r
] to select
“YES ”, and press
[OK] to confirm.
YES : Choice for resetting
NO : Choice against resetting
• To cancel, select “NO ”.
Factory setting: NO
• When you select “YES ”, the input is switched to “FM ”.
4. To finish the setting (
➔
pa
ge 36)
Note
Note
Note
SA-BX500-PP (RQT9223-Y)_En.indd 40 6/27/2008 4:06:18 PM