


21
RQT9223
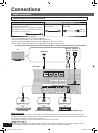
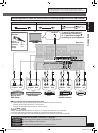
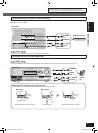
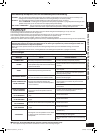
Other connections
• Turn off all equipment before making any connections.
• Peripheral equipment sold separately unless otherwise indicated.
• To connect equipment, refer to the appropriate operating instructions.
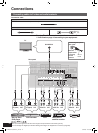
Connections
Preparations
BACK
OUT
IN IN
CD
BD/DVD PLAYER / ANALOG 8CH IN DVD RECORDER
VCR
CABLE/SAT
GAME
TV
AUDIO
SURROUND BACK
SURROUND
FRONT
SUBWOOFER
OUT
IN IN
IN
(DVD RECORDER)
(BD/DVD PLAYER)
(CABLE/SAT)
HDMI 1
HDMI 2 HDMI 3
CK
COMPONENT VIDEO
L
R
IN IN IN
IN
OUT IN
IN
OUT
OUT
IN IN IN
IN
TV MONITOR
TV MONITOR
DVD RECORDER
VCR
CABLE/SAT
GAME
DVD PLAYER
BD/(BD/
DVD PLAYER)
(DVD RECORDER)
(CABLE/SAT)
1 2
3
DIGITAL IN
(DVD RECORDER) (BD/DVD PLAYER)
(TV)
(CD)
OPTICAL 1
OPTICAL 2 OPTICAL 3 COAXIAL
SUBWOOFER
Y
P
B
P
R
IN
OUT
OUT
IN IN IN IN
TV MONITOR
DVD RECORDER
VCR
CABLE/SAT
GAME
DVD PLAYER
BD/
OUT
CENTER
IN
IN
FM ANT
AM ANT
LOOP
EXT
75
Ω
L
LOOP ANT
GND
VIDEO
S VIDEO
OPTION V.1
DC OUT/SORTIE C.C.
5V 500mA MAX
S VIDEO
IN
VIDEO IN
(L)
AUDIO
(R) IN
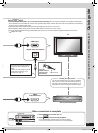
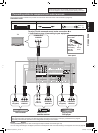
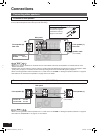
DVD recorder, etc.
To connect the unit for audio or picture recording
You can record audio or pictures to the equipment connected to DVD recorder output terminal (AUDIO, VIDEO, S VIDEO).
See page 41 for more details.
Note
• Connect the recording unit and source unit using the same cable.
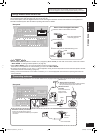
To connect the unit to a video camera etc.
These terminals are convenient for equipment you want to connect only temporarily.
Note
• Use a cable,
or
that belongs to the same type as the video cab
le you used for connecting the unit to your TV.
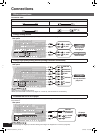
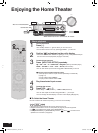
Rear panel
WIRELESS READY
SURROUND M.ROOM
INPUT SELECTOR
VOLUME
+
_
MULTI CH
PROCESSING
TrueHD
D+
DTS-HD
MULTI CH
LPCM
BI-AMP
SETUP MIC
AUX
TUNE
RETURN
AUTO SPEAKER SETUP
-
SETUP
OK
SURROUND
SPEAKERS A
SPEAKERS B
S VIDEO
VIDEO
L - AUDIO - R
POWER
S VIDEO
OUT
VIDEO
OUT
(L)
AUDIO
(R) OUT
Video
camera
etc.
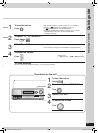
Ho
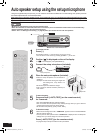
w to attach or remove the front terminal cover
• Attaching the cover is recommended to protect terminals when not in use.
To attach
To remove
Place the dent on the left to insert. Press the dent. Hold the protr
usion to remove.
The dent
T
erminal cover
SA-BX500-PP (RQT9223-Y)_En.indd 21 6/27/2008 4:05:41 PM