


37
RQT9223
Using the setup menu
Operations
Adjusting the brightness of the display
Dim the display for better viewing in a darkened room.
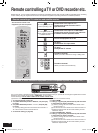
1. To enter the SETUP (
➔
pa
ge 36)
2. Press [
e
][
r
] to select
“DIMMER ”, and
press [OK] to confirm.
3.
Press [
e
][
r
] to select the setting,
and
press [OK] to confirm.
Adjustment range: DIMMER 1 (bright) to DIMMER 3 (dim)
Factory setting: DIMMER OFF
4. To finish the setting (
➔
pa
ge 36)
Note
• Select “DIMMER OFF ” to cancel.
• The br
ightness changes at the point of changing the setting.
To confirm the setting, press [OK].
Using sleep timer
The unit automatically turns off when set time passes. This is a
convenient function when going to bed, etc.
1. To enter the SETUP (
➔
pa
ge 36)
2. Press [
e
][
r
] to select
“SLEEP ” and
press [OK] to confirm.
3.
Press [
e
][
r
] to select the setting,
and
press [OK] to confirm.
Setting range: OFF, 30, 60, 90, 120 (minutes)
Factory setting : OFF
4. To finish the setting (
➔
pa
ge 36)
Note
• To cancel, select “OFF ”.
• “SLEEP” is displayed when the setting is complete.
• Once the sleep timer is set, the remaining time is displayed in
step 2.
• To change the setting, set time again in step 3.
Setting speakers and their sizes
You can set connected speakers and their sizes manually.
Different ranges are played by different speakers. Size setting
is necessary for reproducing sources, particularly their bass
section, completely.
1. To enter the SETUP (
➔
pa
ge 36)
2. Press [
e
][
r
] to select
“SPK SIZE ”, and
press [OK] to confirm.
3.
Press [
e
][
r
] to select a speaker to set,
and press [OK] to confirm.
SUBW : Subwoofer, LR : Front speakers,
C : Center speaker, S : Surround speakers,
SB : Surround back speakers
4. Press [
e
][
r
] to c
hange the setting, and
press [OK] to confirm.
SUBW : NO ; unconnected YES ; connected
LR, C, S :
NONE ; For speakers you haven’t connected (center or
surround
only).
SMALL ; For speakers that cannot adequately reproduce
the
bass range. This setting is sufficient for most
speakers if you are using a subwoofer.
LARGE ; For speakers that can sufficiently reproduce the
bass
range down to 20 Hz.
SB :
NONE ;
For speakers you haven’t connected.
1-SPK ;
If you connect one surround back speaker.
2-SPK ;
If you connect two surround back speakers.
Factory settings: SUBW ; YES
LR, C, S ; SMALL
SB
; 2-SPK
5. To finish the setting (
➔
pa
ge 36)
Note
• Set the lowpass filter frequency according to frequencies
available for playback when speakers are set as “SMALL ”.
The f
actory setting is 80 Hz (
➔
page 38).
• See the note on page 51.
Setting distances
By adjusting the distance from each speaker (except the
subwoofer) to the seating area, the sound delay time is
automatically adjusted so that sound reaches the listener at
the same time
.
1. To enter the SETUP (
➔
pa
ge 36)
2. Press [
e
][
r
] to select
“DISTANCE ”, and
press [OK] to confirm.
3. Press [
e
][
r
] to select a speaker to set,
and press [OK] to confirm.
L : Front left, R : Front right, C : Center,
LS : Surround left, RS : Surround right,
SBL : Surround back left,
SBR : Surround back right
4. Press [
e
][
r
] to select the distance and
press [OK] to confirm.
Adjustment range: 1.0 to 45.0 ft (feet)
This unit is adjusted at 0.5 f
eet intervals.
Factory settings: L, R ; 10.0 ft
(feet)
C ; 10.0 ft
(feet)
LS, RS ; 5.0 ft
(feet)
SBL, SBR ; 5.0 ft
(feet)
5. To finish the setting (
➔
pa
ge 36)
Note
• Speakers whose polarity was automatically adjusted through
the auto speaker setup (
➔
pages 24 and 25) are displa
yed
with “– ” such as “L 3.0 – ”.
•
When the speaker distance measured through the auto
speaker setup (
➔
pages 24 and 25) e
xceeds 15 meters
(45 feet), the distance is displayed as “OVER ”.
SA-BX500-PP (RQT9223-Y)_En.indd 37 6/27/2008 4:06:16 PM