


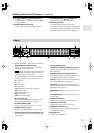

9
Getting to Know the AV Receiver
The actual front panel has various logos printed on it. They are not shown here for clarity.
For detailed information, see the pages in parentheses.
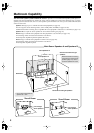
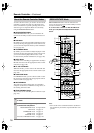
A
STANDBY/ON button (50)
Sets the AV receiver to On or Standby.
B
STANDBY indicator (50)
Lights up when the AV receiver is on Standby and
flashes while a signal is being received from the
remote controller.
C
READY indicator (109)
North American model doesn’t have this indicator.
Lights up when the AV receiver is on Standby and
HDMI Power Control is enabled.
D
ZONE 2 indicator (123)
Flashes when Zone 2 is being set. Lights up when
Zone 2 is on.
E
ZONE 3 indicator (123)
Flashes when Zone 3 is being set. Lights up when
Zone 3 is on.
F
Remote-control sensor (15)
Receives control signals from the remote controller.
G
Display
See “Display” on page 11.
H
DISPLAY button (77)
Displays various information about the currently
selected input source.
I
MASTER VOLUME control (68)
Sets the volume of the AV receiver to –
∞
dB,
–81.5 dB, –81.0 dB through +18.0 dB (relative dis-
play).
The volume level can also be displayed as an abso-
lute value. See “Volume Setup” on page 106.
J
PURE AUDIO button and indicator (79)
Selects the Pure Audio listening mode. The indica-
tor lights up when this mode is selected. Pressing
this button again selects the previous listening
mode.
K
AUDIO SEL button (78)
Selects the audio input: analog, digital, HDMI, or
multichannel.
L
Input selector buttons (68)
Select the following input sources: DVD,
VCR/DVR, CBL/SAT, GAME/TV, AUX 1, AUX 2,
TAPE, TUNER, CD, PHONO, NET/USB.
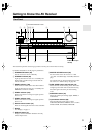
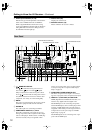
Front Panel
STANDBY/ON
MASTER VOLUME
CDTUNER
TAPECBL/SAT GAME/TV AUX 1
AUX 2VCR/DVR
DVDAUDIO SELPURE AUDIO PHONO
NET/USB
DISPLAY
PUSH TO OPEN
STANDBY
READY
ZONE 2
ZONE 3
98
6 71 2
3
LKJ
54
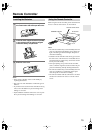
Front flap
Not North American model
Push here to open
the flap