


86
Setup Menu
—Continued
You can change Setup Menu settings using the buttons on the front panel and on the remote controller.
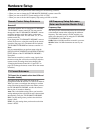
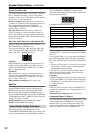
The illustrations here represent the remote controller.
When you perform settings using the buttons on the
front panel, press the [SETUP] button first. Use the
[SELECT/PRESET] dial instead of the [ ]/[ ] buttons
to select menus or parameters and press the dial to
confirm your selection. Then use the [CONTROL/
TUNING] dial instead of the [ ]/[ ] buttons to select
your setting or parameter values and press the dial to
confirm your selection. In addition, the [EXIT] button is
used instead of the [RETURN] button.
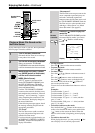
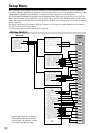
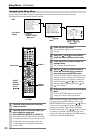
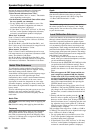
Navigating the Setup Menu
Main A Setup
=====================
0.Hardware Setup
1.Speaker/Output Setup
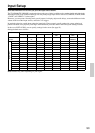
2.Input Setup
3.Listening Mode Setup
4.Audio Adjust
5.Preference
6.i.LINK Setup
7.Network Setup
8.Lock/Version
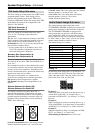
1.Speaker/Output Setup
=====================
1.Speaker Configuration
2.Speaker Impedance
3.Speaker Crossover
4.Speaker Distance
5.Notch Filter
6.Level Calibration
7.THX Audio Setup
8.Audio Output Assign
9.Video Output Assign
1-1.Speaker Config
=====================
Speaker A
a.Front L/R :Main A
b.Center :Main A
c.Surr L/R :Main A
d.Surr Back
:Main A 2ch
e.Subwoofer :Main A
OSD
Front panel
display
Main menu
Menu
Sub-menu
1
Press the scroll wheel when using the
remote controller.
2
Press the button of the room where you
want to perform operations.
Press [MAIN A], [MAIN B], or [ZONE 2].
If the room where you want to perform operations
has already been activated, you do not have to press
the button here. Pressing the button while the
corresponding room is activated deactivates the
room for setup.
--
/
---
@.
-
'
/ ABC DEF
PQRS TUV WXYZ
DIRECT TUNING
GHI JKL MNO
CAPS DELETE
LANGUAGE LOCATION
ALBUM AR
TIST GENRE
PLAYLIST
REPEAT VIDEO MUSIC PHOTO
CUSTOM
DISPLAY
DIMMER
T
V
INPUT
SLEEP
RANDOMREC
MAIN A MAIN B
MUTING
ENTER
LAST MANGLE
SUBTITLE
AUDIO
MEMORY
SEARCHA
-
BREPEAT
ON STANDBY
TV
TV CH
TV VOL
S
E
R
V
E
R
A
U
D
I
O
A
D
J
E
X
I
T
G
U
I
D
E
PREV
CH
+
10 0
CLEAR
123
456
789
INPUT
T
O
P
M
E
N
U
M
E
N
U
S
E
T
U
P
R
E
T
U
R
N
ZONE
2
INPUTMODE
MACRO
VOL
CH
DISC
TEST T
O
NE
CH SEL
PURE A
SURR
DIRECT
STEREO
Re
-
EQ
THX
A
LL
ST
LEVEL
+
LEVEL
-
L NIGHT
AUDIO
SEL
DSP DSP
+
-
+
-
I
ZONE
3
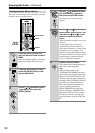
#
MAIN A,
MAIN B
ZONE 2
SETUP/
ENTER/
RETURN/
Cursor
/ //
Scroll wheel
RC-557M
RC-558M
3
Press the [SETUP] button.
The main menu appears on your television
monitor.
4
Using the [ ] and [ ] cursor buttons,
select the menu that you want to enter.
5
Press the [ENTER] button to enter the
selected menu.
The screen for that menu appears.
6
Use the [ ] and [ ] cursor buttons to
select the sub-menu that you want to
enter and press the [ENTER] button.
Each sub-menu has different settings that can be
changed as desired, and they are all explained in
the pages that follow. To change a setting, first
select it using the [ ] and [ ] cursor buttons,
and then change the setting using the [ ] and
[ ] cursor buttons.
7
Press the [SETUP] button to exit the Setup
Menu.
Press the [RETURN] button to set the new
settings and return to the previous menu.