


70
Recording a Source—Continued
Some steps can also be operated on the remote control-
ler, but described here are operations on the
TX-NR1000/TX-NR5000E.
Notes:
• No surround effects can be recorded.
• No DVD or any sources whose copyright is protected
can be recorded.
• There are some restrictions on recording of digital
audio/video signals. Refer to the manual of your
recording component.
• If recorded as analog signals, DTS signals are
recorded as noise, so never record signals from a
DTS-compatible CD or LD.
Recording music or a movie you are currently playing.
Operate on the TX-NR1000/TX-NR5000E in the main
room.
You can record an audio source or a video on a compo-
nent while playing another source on another compo-
nent. For example, you can record a CD while watching
a DVD. Operate this function on the TX-NR1000/
TX-NR5000E in the main room.
Recording Audio/Video While Playing
1
Turn on the power supply to the TX-NR1000/
TX-NR5000E.
2
Check the connection to your recording
component.
An audio recorder should be connected to the
AUDIO OUT or DIGITAL OUT jacks, and a
video recorder to the VIDEO OUT jacks.
3
Check settings for a recorder connected.
1. On the Setup menu (See page 91), select
“Speaker/Output Setup” → “Audio Output
Assign,” and specify “Rec Out” as the setting
for the jack to which your audio recording
component is connected.
2. Similarly, select “Speaker/Output Setup” →
“Video Output Assign,” and specify “Video
XX Rec Out” as the setting for the jack to
which your video recording component is
connected.
3. Press the [SETUP] button to close the menu.
Hint:
Since Zone 3 Out and Rec Out use the same cir-
cuitry, audio recording is disabled if Zone 3 Out
is specified. Audio/video recording is also dis-
abled on the same component as that for playing.
STANDBY/ON
STANDBY
PURE AUDIO
MASTER VOLUME
OPEN
ZONE 2
()
GREEN
MAIN
()
BLUE
REC
/
ZONE 3
(
)
RED
DISPLAY
DVD
VIDEO
3
VIDEO 4 VIDEO 5 VIDEO 6 VIDEO 7VIDEO 2VIDEO 1
MEMORY
SETUP
EXIT
PHONES
VIDEO 7 INPUT
S VIDEO
DIGITAL
AUDIO
VIDEO L R
LISTENING
MODE
AUDIO
SELECTOR
TONE
CLEAR
DIMMER
ZONE
2 REC/
ZONE 3
LEVEL LEVEL
SELECT/
PRESET
CONTROL
/
TUNING
PUSH TO ENTERPUSH TO ENTER
C
D NET AUDIOPHONOTUNERTAPE 1 TAPE 2
TUNING
MODE
REC/ZONE 3SETUP
CONTROL/TUNING
SELECT/PRESET
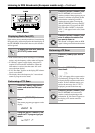
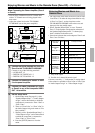
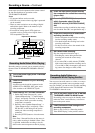
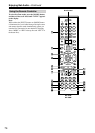
Input source buttons
STANDBY indicator
4
Press the input source button to select
the component for audio/video recording
(player side).
5
Press the [REC/ZONE 3] button, and
within 3 seconds, select “Rec Sel:
SOURCE” with the [CONTROL/TUNING]
dial.
Audio/video recording is enabled on the compo-
nent for which “Rec Out” was specified in step 3.
6
Prepare the component for audio/video
recording (recorder side).
• Put the component for audio/video recording
into the recording standby status.
• You should adjust the recording level on the
recording component.
• For how to record, refer to the manual of the
recording component.
7
Start audio/video recording.
Play the component selected in step 4.
• Switching the source during audio/video
recording will record the source newly
selected.
• If you select FM (or AM) with the [TUNER]
input source button when the recording source
is set to AM (or FM), the output for the record-
ing source also changes to AM (or FM).
Recording Audio/Video on a
Component While Playing Another
1
Turn on the power supply to the TX-NR1000/
TX-NR5000E in MAIN A or MAIN B mode.
Proceeding to the next step in the Standby status
makes the Zone 3 mode effective, so be sure to
turn on the power source.
2
Check connections and settings to the
recording component.
Refer to steps 2 and 3 in “Recording Audio/
Video While Playing” in the previous section.